

Bloom: Setup Your Online Food Ordering App in Minutes
Effortless Management with Live Order Monitoring, Smart Emailing, Text Alerts, Client Feedback, S3 Uploads and Additional Features


I sincerely want to express my gratitude to Outerbase and Hashnode, the organizers of this hackathon, for giving me this incredible opportunity. I also want to thank Brayden, Brandon, Steve, and Dani for their consistent presence and unwavering support whenever any issues came up.
Team Members
- Aryan Kumar (Hashnode: aryan)
Description: The Motivation to Build
In today's fast-paced food delivery landscape, platforms like Zomato, Doordash, and others have become indispensable for both customers and restaurants. They offer convenience and expanded customer reach, and are vital for restaurant growth.
However, the digital marketing world is vast, and restaurants often grapple with how to boost sales and enhance customer engagement.
Enter Instagram, a major social media player. For restaurants, it's a potent tool to showcase dishes, engage loyal customers, and attract new ones to their websites. By sharing tempting food photos and crafting an appealing brand image, restaurants can guide customers to their websites, gaining more control over orders and avoiding steep third-party platform fees.
The creation of "Bloom" was inspired by the need for restaurants to establish a comprehensive CRM system to help them launch websites and increase sales. Bloom utilizes OuterBase plugins for features such as customizable menus, item management, and order tracking.
Bloom also offers Outerbase plugins for image uploads, order management, and integration with Outerbase commands text notifications, automatic emails, and customer reviews. These tools assist restaurants in generating more revenue while providing a unique and efficient experience. Bloom is ideal for restaurants seeking an affordable CRM solution with granular control through OuterBase plugins and the power of Outerbase commands w/ nodes. 💙
Tech Stack
What's included in the architecture?
Frontend: Next.js
Backend: Vercel Serverless, TRPC, Clerk for authentication
Command Integration: Slack API, Notion Database, Mailgun API, Twilio API, Stripe API, Uptash Redis API
Plugins Created:
Column Plugin ( AWS S3 Uploader w/ Configuration Window )
Bloom Order Manager Table Plugin ( Manage Order Tracking )
Live Website
https://bloom-foods.vercel.app/
admin user credentials :
Email: example@example.com
Password: TEN!HazQr2DH8Sv
Demo Video
A demonstration video highlighting the features and functionalities of Bloom.
Outerbase Usage
Let's dive into how each component of the OuterBase-powered restaurant CRM functions. We'll explore the OuterBase services we leverage, our security measures, authentication, and the usage of various API integrations, such as Slack for order notifications and custom query management, Notion Databases for storing review records, Mailgun for emailing, Twilio for SMS, and Stripe API to handle payments, paired with Upstash to securely manage payment intents for Stripe.
Additionally, we utilize commands to manage a shopping cart in the cloud, along with live order tracking. We make powerful use of OuterBase plugins to manage all orders directly through an interface to the database via a table plugin, which aligns perfectly with the OuterBase tagline, "The interface for your database." We employ a column plugin to change images of menu items in the table, while also providing an admin panel in the Next.js app, allowing the admin to set the menu.
1‣ Architecture
i. Supabase as a PostgreSQL Database
First, we set up a new base in OuterBase and created a connection to Supabase. To get started, follow this excellent blog by Rocky Essel : https://rockyessel.hashnode.dev/connecting-outerbase-to-supabase-postgres
We established a connection to the Supabase PostgreSQL database using our database credentials on the OuterBase interface, achieving a seamless connection that allowed us to get started quickly. After that, we set up the following tables:
| Table name | Table Description | Query Code link |
| foodcategories | to store the menu food categories such as appetizers, beverages, etc. | create-food-categories-table.sql |
| fooditems | this table stores the food items with a foreign key relationship to foodcategories | create-food-items-table.sql |
| cartitems | Items added to the cart are not stored in a frontend library like Redux; instead, they are maintained in the database and persist across page refreshes. All cart item modifications are persisted in the database. | create-cart-items-table.sql |
| addresses | this table stores the addresses added by a user to their profile, a user can maintain multiple addresses and can add location with the Google Maps API integration into the frontend application | create-user-addresses-table.sql |
| orders | this table maintains the food orders of all users across the app | create-orders-table.sql |
ii. Web Architecture ( Next 13 w/ TRPC )
We use Next.js and TRPC for the front-end and server side, using the latest Next 13 version and an app folder. We also use Clerk Auth to handle login between the front end and TRPC.
The customizable environment variable parameters are provided in the Next.js app for each service, allowing for complete personalization to cater to individual restaurants' requirements.
#.env.example file
#restaurant_metadata
NEXT_PUBLIC_RESTAURANT_NAME=Bloom
NEXT_PUBLIC_RESTAURANT_CONTACT_NO=
#clerk
NEXT_PUBLIC_CLERK_PUBLISHABLE_KEY=
CLERK_SECRET_KEY=
NEXT_PUBLIC_CLERK_SIGN_IN_URL=/sign-in
NEXT_PUBLIC_CLERK_SIGN_UP_URL=/sign-up
NEXT_PUBLIC_CLERK_AFTER_SIGN_IN_URL=/dashboard
NEXT_PUBLIC_CLERK_AFTER_SIGN_UP_URL=/dashboard
#stripe
STRIPE_SECRET_KEY=
NEXT_PUBLIC_STRIPE_PUBLISHABLE_KEY=
STRIPE_MARK_PAID_WEBHOOK_KEY=
#outerbase
OUTERBASE_COMMANDS_ROOT_DOMAIN=
#googlemaps
NEXT_PUBLIC_GOOGLE_MAPS_API_KEY=
#app
NEXT_PUBLIC_DOMAIN=
NEXT_PUBLIC_CURRENCY=USD
NEXT_PUBLIC_CURRENCY_SYMBOL="\$"
NEXT_PUBLIC_TAX_PERCENTAGE=15
#mailgun
MAILGUN_DOMAIN=
MAILGUN_API_KEY=
FROM_EMAIL=sender@example.com
#slack
ORDER_NOTIFICATIONS_CHANNEL_WEBHOOK=
CUSTOMER_QUERIES_CHANNEL_WEBHOOK=
#upstash
UPSTASH_REDIS_REST_TOKEN=
UPSTASH_ENDPOINT=
#notion
NOTION_INTEGRATION_KEY=
NOTION_DATABASE_ID=
#aws S3 for images
ACCESS_KEY=
SECRET_KEY=
REGION=
BUCKET_NAME=
#twilio ( for sms )
TWILIO_ACCOUNT_SID=
TWILIO_AUTH_TOKEN=
TWILIO_FROM_PHONE_NUMBER=
In the TRPC backend, after logging in, we utilize Outerbase commands along with the user ID obtained from Clerk JWTs on the server side. This enables us to perform secure actions on behalf of the user.
Users who are admins can change the menu. To make someone an admin, simply add this JSON to their publicMetadata in clerk:
// Granting Admin Access
// We are adding the following json to the publicMetadata of a clerk user.
// Admin users will have the privilege to edit the restaurant's menu.
{
"role": "admin"
}
iii. Authentication ( Clerk Auth Provider )
For authentication purposes, we use Clerk Auth, which has proven to work seamlessly in conjunction with TRPC, providing robust JWT-based authentication and role-based access control.
We have created a TRPC middleware to establish protected routes for API endpoints, ensuring their security.
2‣ Outerbase Commands
Bloom utilizes a total of 28 Outerbase commands, ranging from single-node SQL commands to multi-node JavaScript and SQL commands. As explaining all 28 commands would make this article excessively lengthy, I have outlined the major integrations used. The complete Outerbase commands repository is linked at the end of the article.
a‣ Slack API Integration into Outerbase Commands
We primarily create two Slack channels and integrate them into various locations within the Outerbase commands as webhooks:
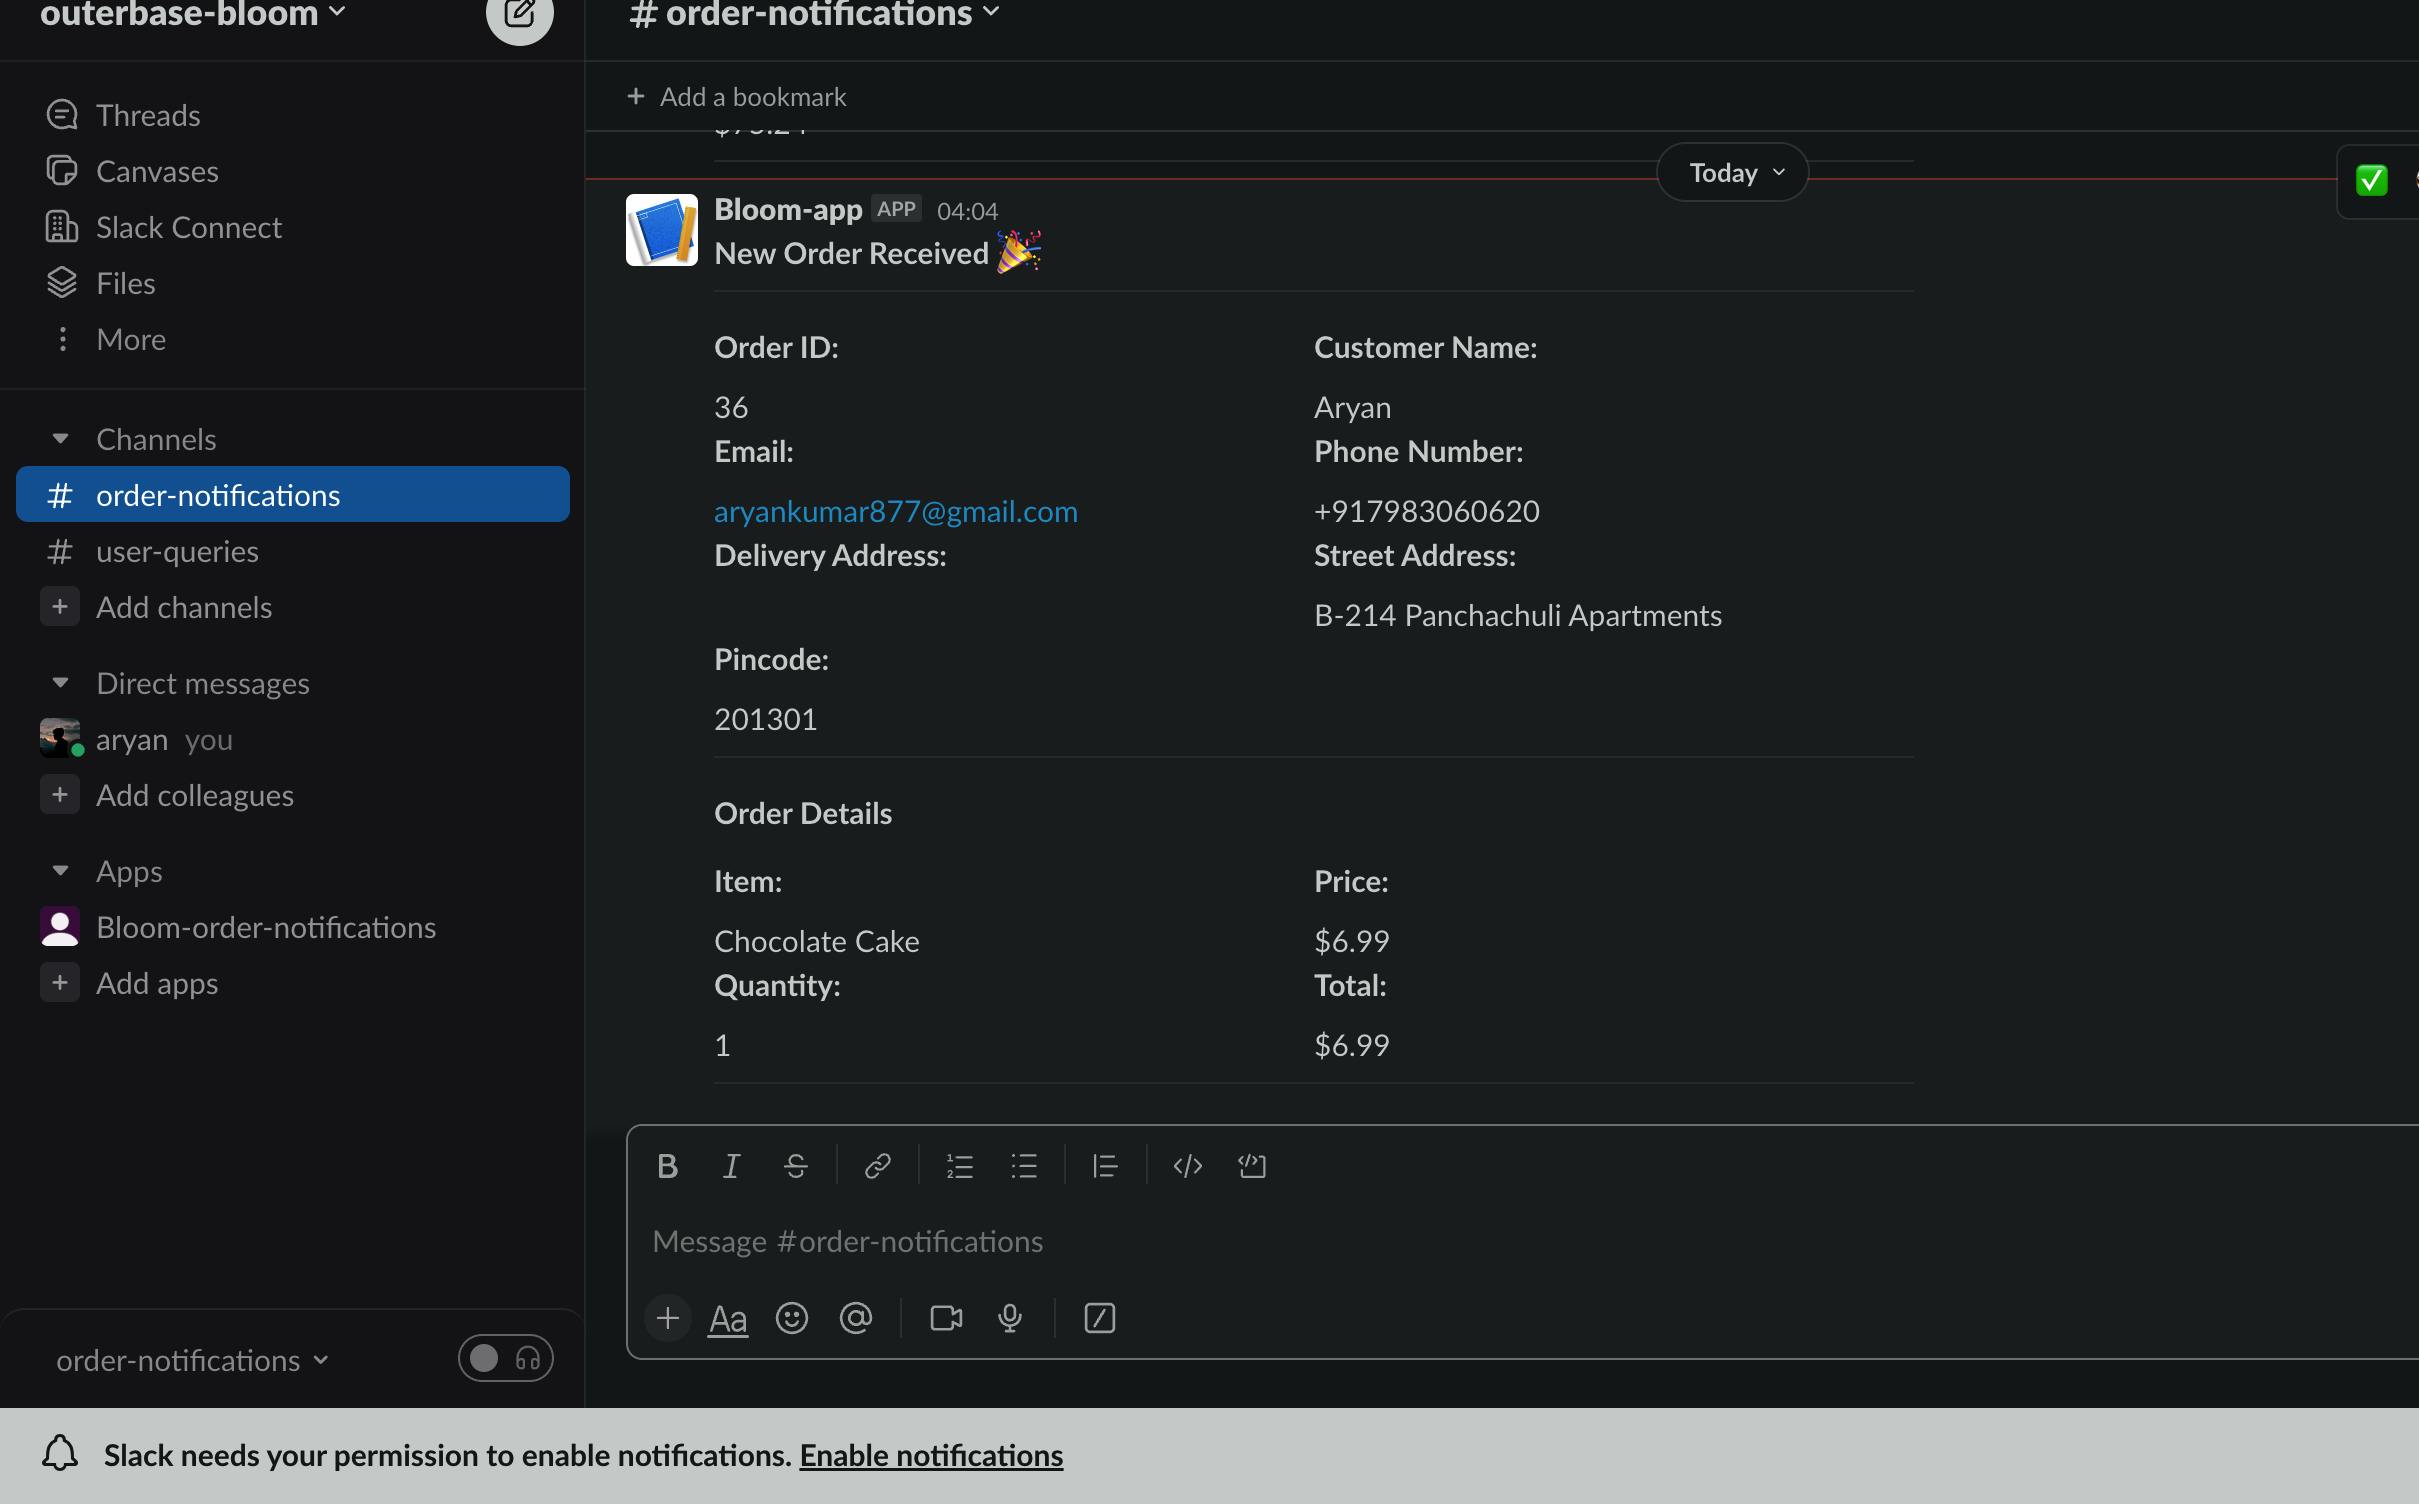
Channel 1 for order notifications for the restaurant after a successful payment with Stripe
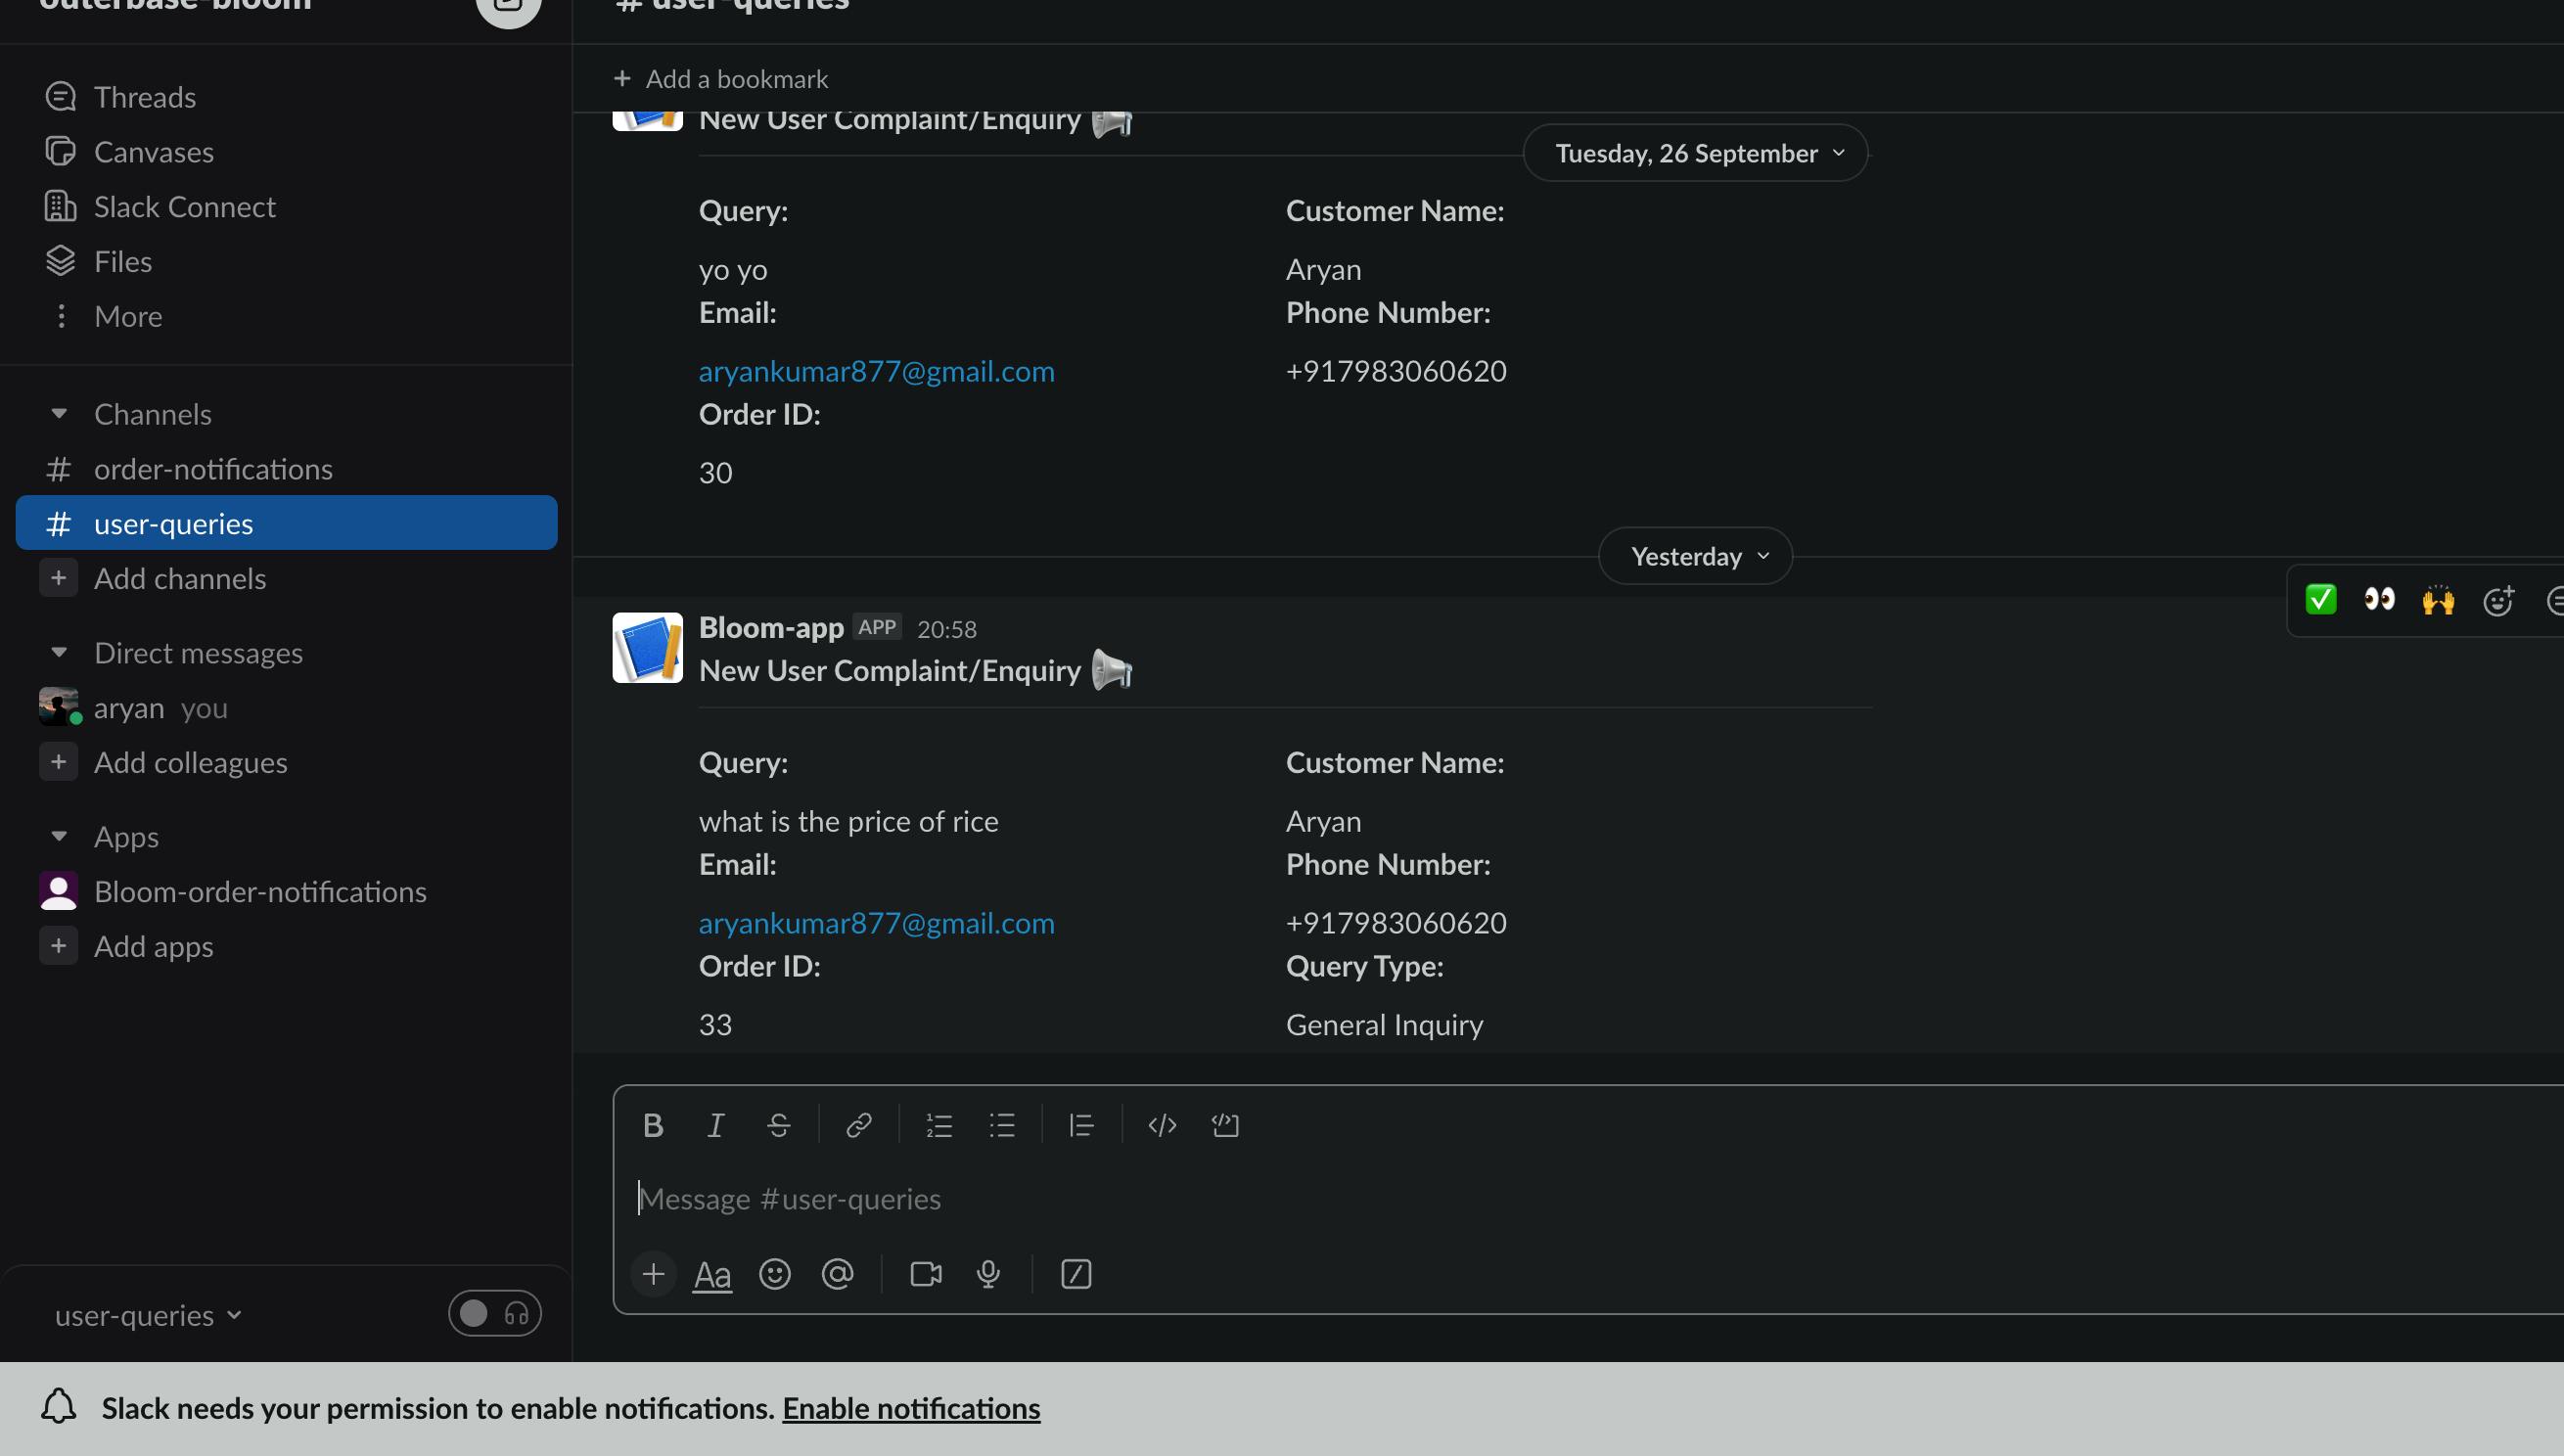
Channel 2 to receive dynamic user inquiries or complaints.
Channel 1 ( order notifications ) in Slack is utilized to generate order notifications for restaurant staff, where a webhook is triggered to supply information such as order ID, item details along with their quantities, total price, user's first name, email address, phone number, and the Google Maps location to the dedicated Slack channel.
Channel 2 ( user queries ) in Slack is designated for submitting user inquiries. This channel receives the user's question, query type ( e.g. order inquiry, general inquiry, etc. are various types of queries coded into Bloom ), phone number, and email address, enabling restaurant staff to promptly address and resolve issues with timely notifications from Slack.
How to set up Slack channels to receive notifications
Step 1: Create Slack Channels
Create two channels in Slack: one for user queries and one for order notifications.
Note the names of these channels.
Step 2: Create Webhooks
Set up incoming webhooks for both channels.
Configure each webhook and obtain the webhook URLs.
Step 3: Set Environment Variables in Next.js
Create a
.env.localfile in your Next.js project.Define environment variables for Slack webhooks:
ORDER_NOTIFICATIONS_CHANNEL_WEBHOOK=[Your Order Notifications Slack Channel Webhook Endpoint]CUSTOMER_QUERIES_CHANNEL_WEBHOOK=[Your Customer Queries Slack Channel Webhook Endpoint]
Replace the URLs with the actual webhook URLs.
Save the
.env.localfile.
GitHub links for Slack commands:
update order status and notify ( 4 nodes, node-3 is for Slack notification on payment success)
send customer query to Slack ( 1 node )
b‣ Stripe API Integration into Outerbase Commands
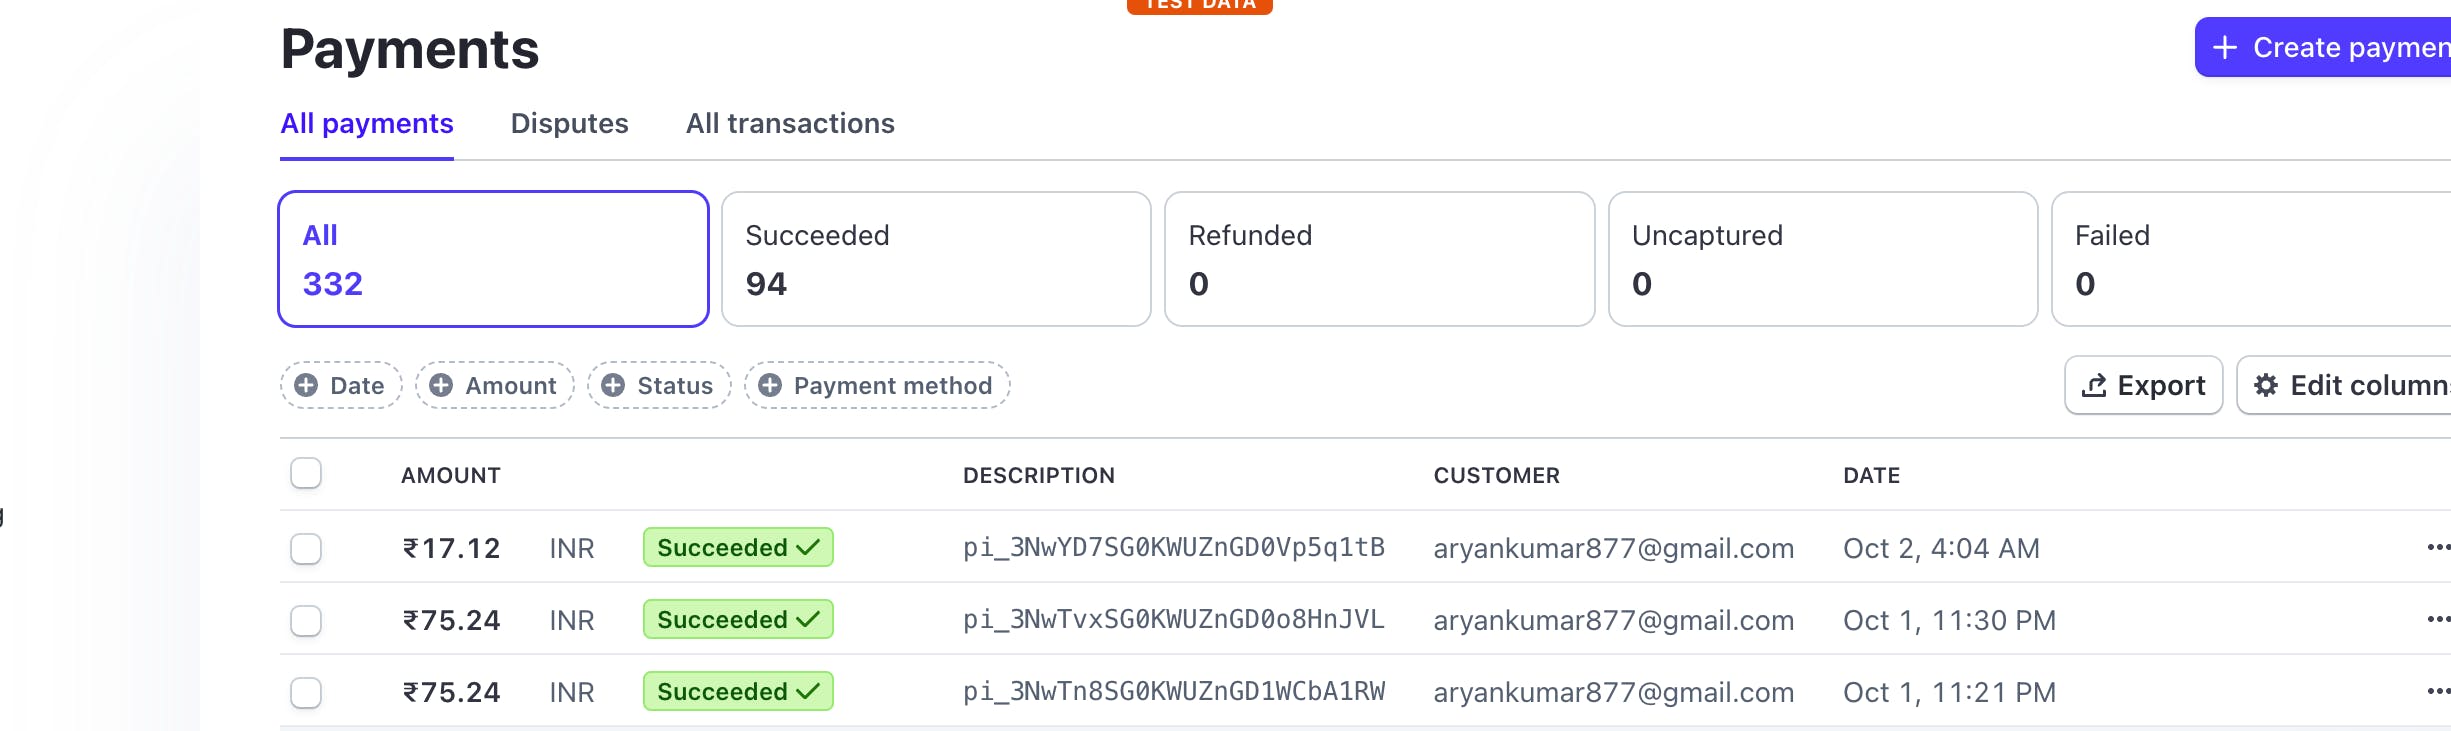
Stripe integration in Outerbase Commands is used to create payment intents for one-time payments made by the user.
A webhook is then triggered by Stripe, which runs a command along with the webhook secret to mark the order as paid.
From this point, real-time tracking can begin, allowing the Order Manager table plugin to update the user about the order in real-time.
How to set up Stripe for payments:
Step 1: Sign Up for Stripe
Go to the Stripe website.
Sign up for a Stripe account by following the registration process.
Step 2: Access Your Stripe Dashboard
- After logging in, you'll be directed to your Stripe dashboard.
Step 3: Obtain Stripe API Keys
In your Stripe dashboard, navigate to the "API" or "Developers" section.
Obtain your Stripe Secret Key and Stripe Publishable Key.
Step 4: Configure Webhook in Stripe
In your Stripe dashboard, go to the "Webhooks" section.
Click "Add Endpoint" to create a new webhook.
Set the endpoint URL to
https://your_project_domain/api/webhook/stripe.Configure the webhook to listen for the
payment_intent.succeededevent to capture successful payment events.
Step 5: Obtain Webhook Signing Secret
- After setting up the webhook, you'll receive a webhook signing secret from Stripe for your webhook endpoint. Note this down.
Step 6: Configure .env File
In your Next.js project's
.env.localfile set the following Stripe environment variables:STRIPE_SECRET_KEY=[Your Stripe Secret Key]NEXT_PUBLIC_STRIPE_PUBLISHABLE_KEY=[Your Stripe Publishable Key]STRIPE_MARK_PAID_WEBHOOK_KEY=[Your Stripe Webhook Key]
GitHub links for stripe commands:
- create stripe payment intent ( 1 node )
c‣ Mailgun API Integration into Outerbase Commands
Mailgun integration in Outebase commands is utilized for the following purposes:
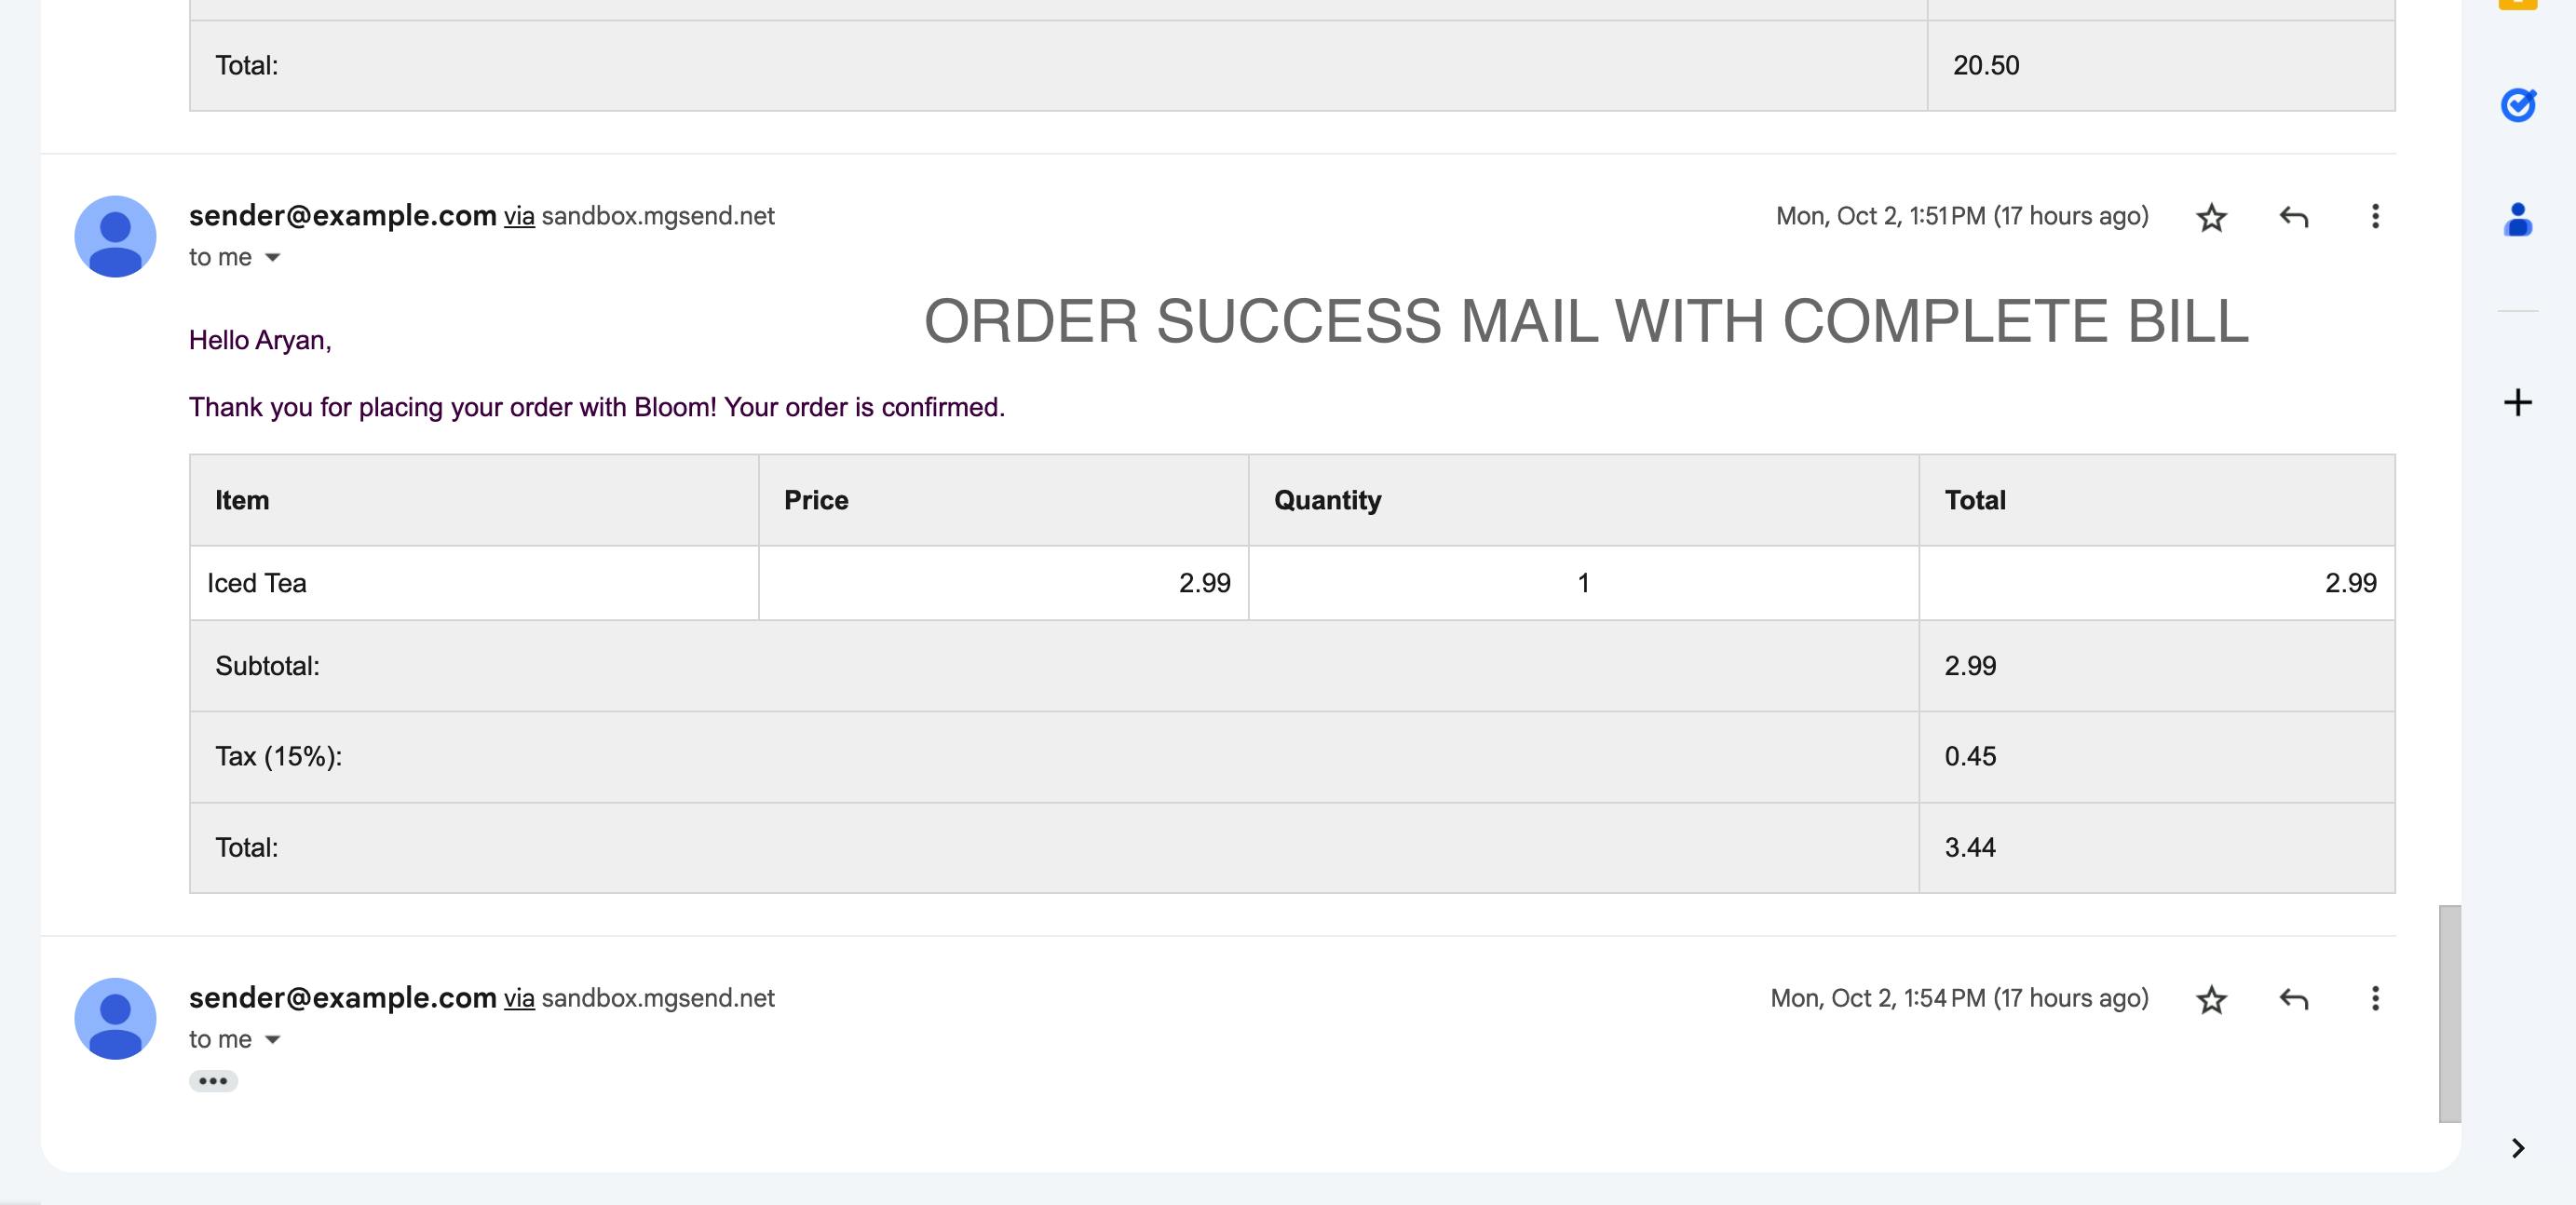
First, we send an email to the user containing their ordered items in a table format, the total price, and their order ID as a confirmation of successful payment through the Stripe webhook through Outerbase Commands.
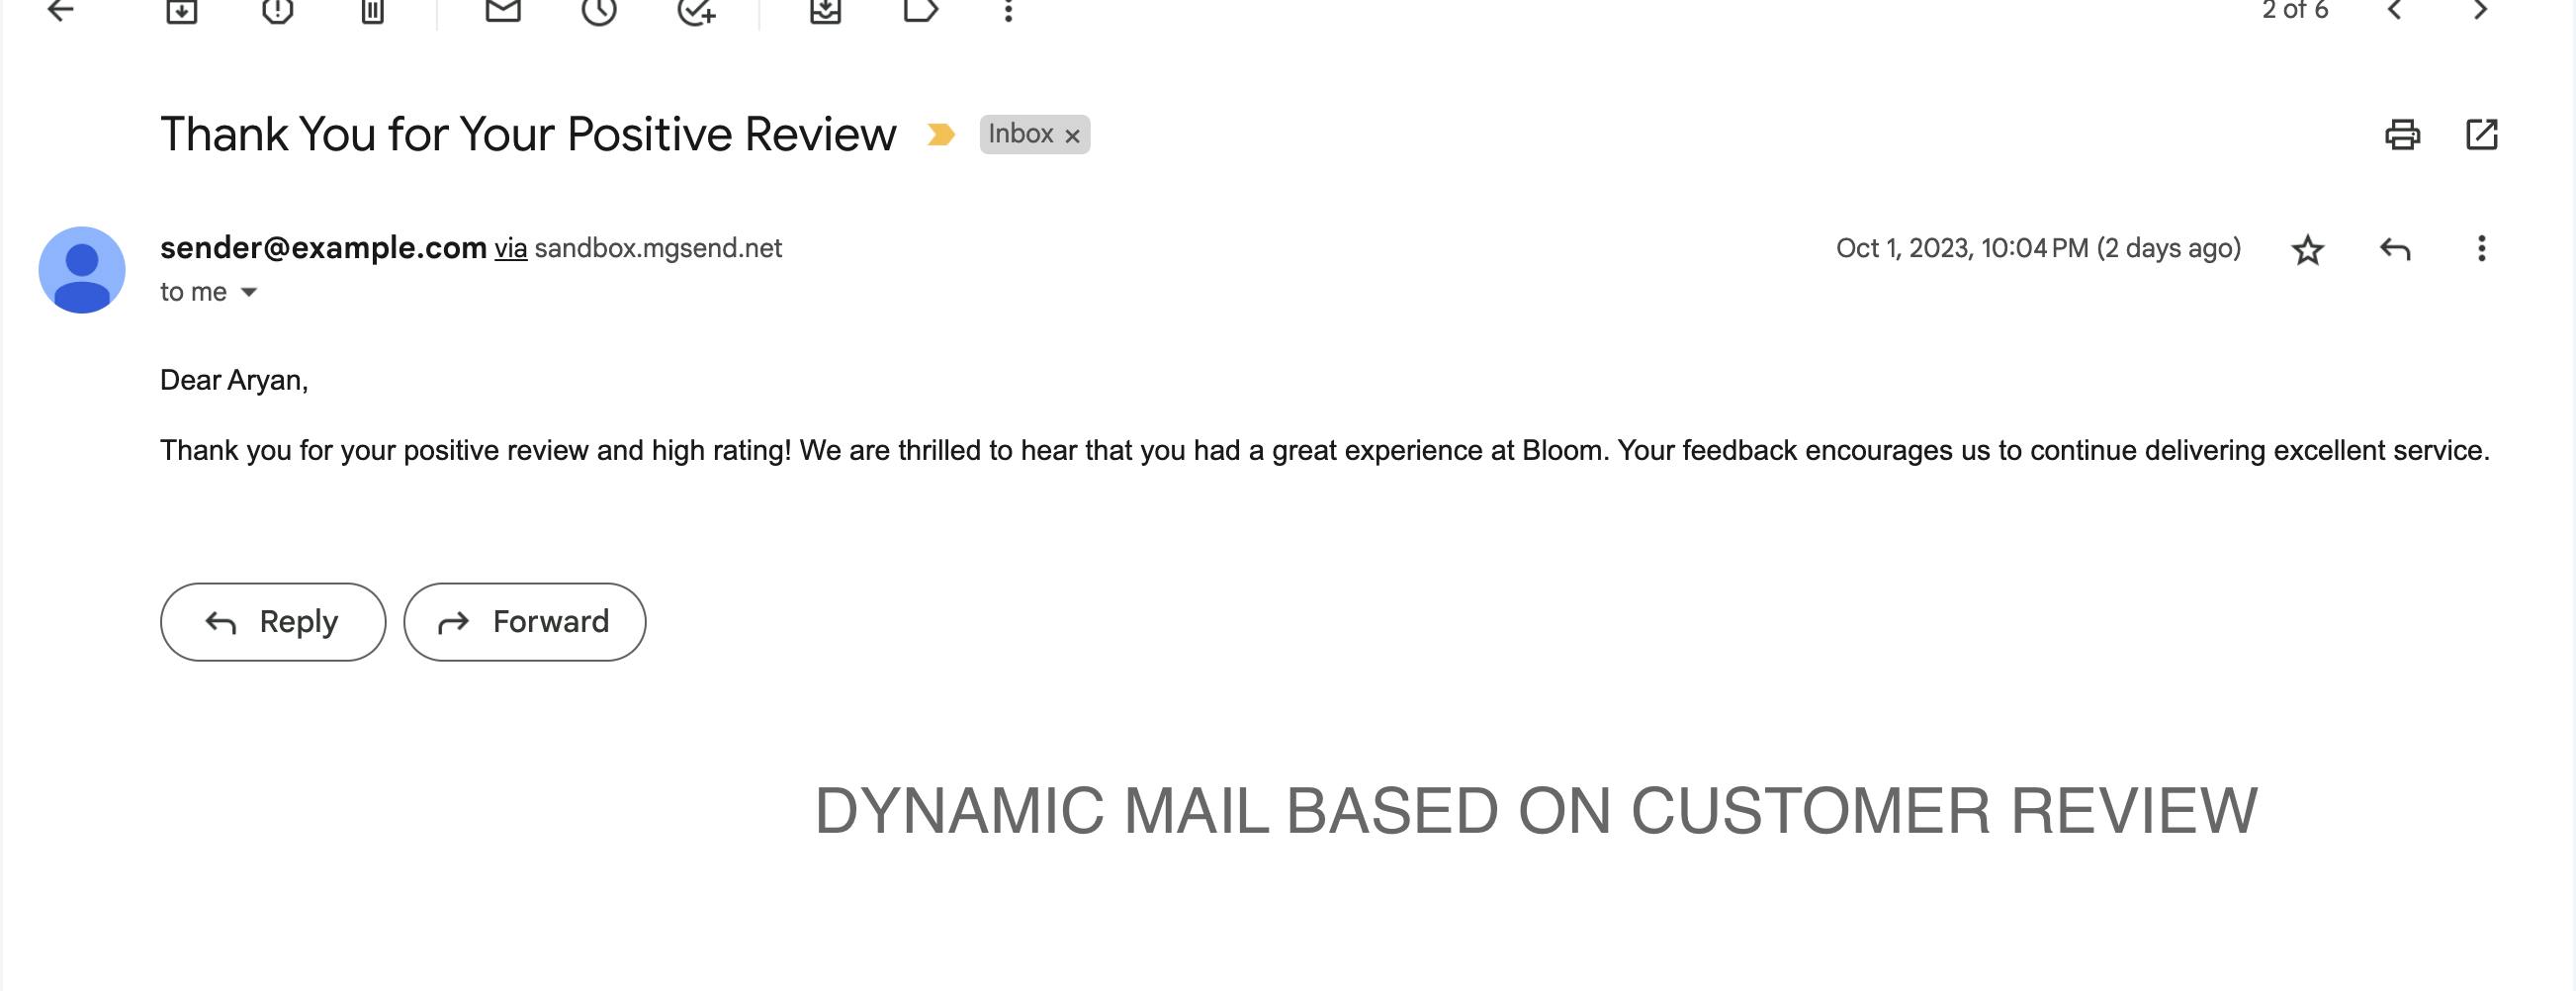
Additionally, it is used to send intelligent, dynamic emails to users based on their reviews. For example, if a user rates the order as 2 stars out of 5, we send a different email than if they had given 5 stars. This is achieved through the use of Outerbase commands with dynamic requests and conditional checks.
How to set the Mailgun API for emails:
Step 1: Sign Up for Mailgun
Go to the Mailgun website.
Click on the "Sign Up" or "Get Started" button.
Follow the on-screen instructions to create an account.
Step 2: Access Your Dashboard
- After logging in, you'll be directed to your Mailgun dashboard.
Step 3: Domain Setup
To send emails with Mailgun, you'll need to set up a sending domain.
Click on "Sending" in the top menu.
Step 4: Add a Domain
Click the "Add New Domain" button.
Choose whether to add a new domain or use an existing one.
Follow the prompts to verify and configure the domain.
Step 5: Retrieve Domain Name
- After successfully adding a domain, you will find your domain name in the dashboard. Note it down for future use.
Step 6: Get API Key
Navigate to the "API Keys" or "API" section in the Mailgun dashboard.
Generate a new API key.
Ensure to securely store the API key.
Step 7: Set Next.js Environment Variables
In the
next.jsapplication's.envfile set the following variables:MAILGUN_DOMAIN=[Use the domain name obtained in step 5]MAILGUN_API_KEY=[Use the API key generatedin step 6]FROM_EMAIL=[Set the sender's email address for sending emails]
GitHub links for Mailgun commands:
send customer review notion ( 3 nodes, node-3 sends uses Mailgun to send emails to customers thanking them for their review )
update order status and notify ( 4 nodes, node-2 sends mail to the customer after the payment succeeds )
d‣ Notion Database Integration ( Recording Reviews )
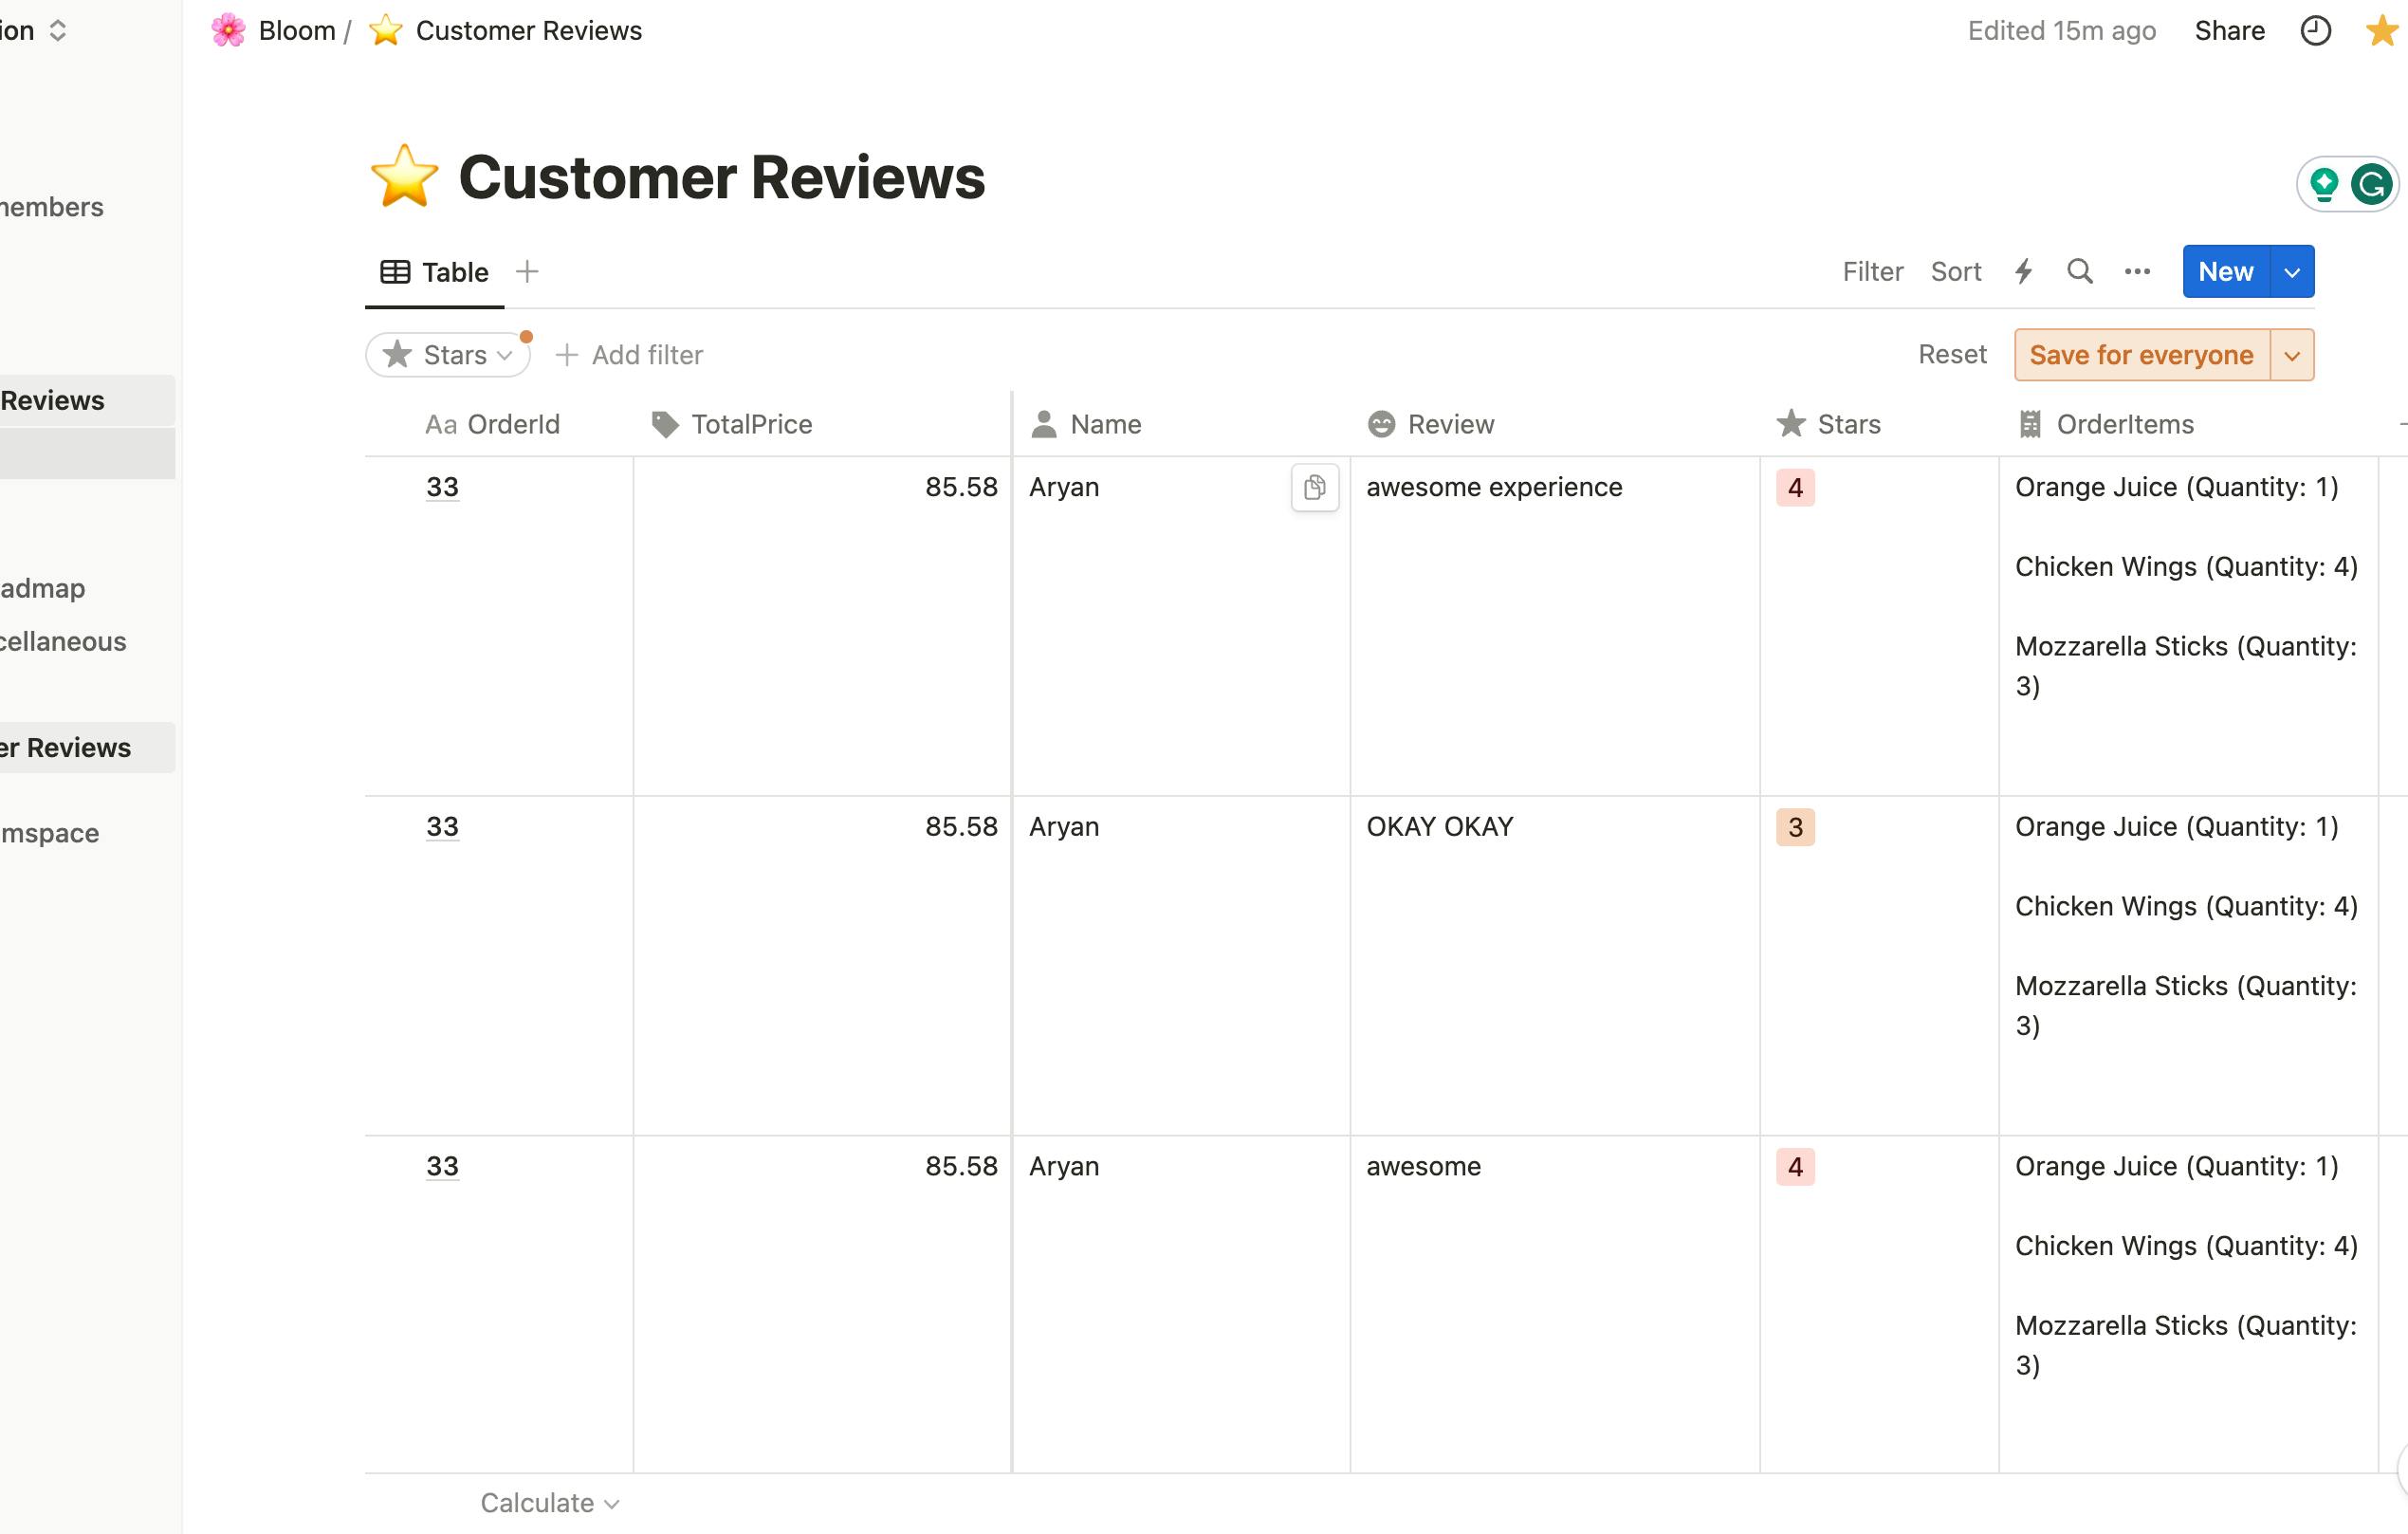
Notion integration is used to record customer reviews on their orders through Outerbase Commands.
The restaurant staff can periodically review this information and make improvements to the quality of service. The idea behind using Notion to record reviews stems from its powerful filtering and sorting mechanisms. Reviews can be sorted by ordered items to identify low-performing items, by price, and so on, offering endless possibilities for analysis and enhancement.
How to set up the Notion database for reviews:
Step 1: Sign In or Create a Notion Account
If you don't have a Notion account, sign up for one at Notion's website.
If you already have an account, sign in.
Step 2: Create a Workspace
After signing in, click on your workspace's name in the top-left corner.
Choose "Settings & Members" from the dropdown menu.
In the "Workspace Settings," click on "Members" and invite members if needed.
Step 3: Create a New Database
In your Notion workspace, click on "+ New" in the sidebar.
Select "Database" to create a new database.
Step 4: Define Database Properties
Define the properties (fields) you want in your integration database. These properties will hold various types of data for your records. Here are some common properties to consider:
OrderId: This could be a "Title" type for order identification.
Name: Use "Rich Text" for customer names.
Review: Also use "Rich Text" for customer reviews.
Stars: Create a "Select" property to rate the order.
OrderItems: Use "Rich Text" for a text representation of order items.
TotalPrice: Use "Number" for the order's total price.
Customize these properties based on your integration requirements. You can add more properties as needed.
Step 5: Get the Integration Key and Database ID
To interact with your Notion database programmatically, you'll need an integration key and the database ID.
Go to Notion's API page and create a new integration.
Follow the prompts to name your integration and select the workspace.
Once created, you'll receive an integration key (secret) that you'll use for authentication.
To find the database ID, go to your Notion database and click "Share" in the top-right corner. You'll find the database ID in the URL after "d=".
Step 6: Set Next.js Environment Variables
In your Next.js project, configure the following environment variables in your
.env.localfile:NOTION_INTEGRATION_KEY=[Your Integration Key]NOTION_DATABASE_ID=[Your Database ID]
GitHub links for Notion commands:
- send customer review notion (3 nodes, node-2 sends the mapped-out review w/ order data to the Notion database )
e‣ Twilio API Integration into Outerbase Commands ( SMS to the user )
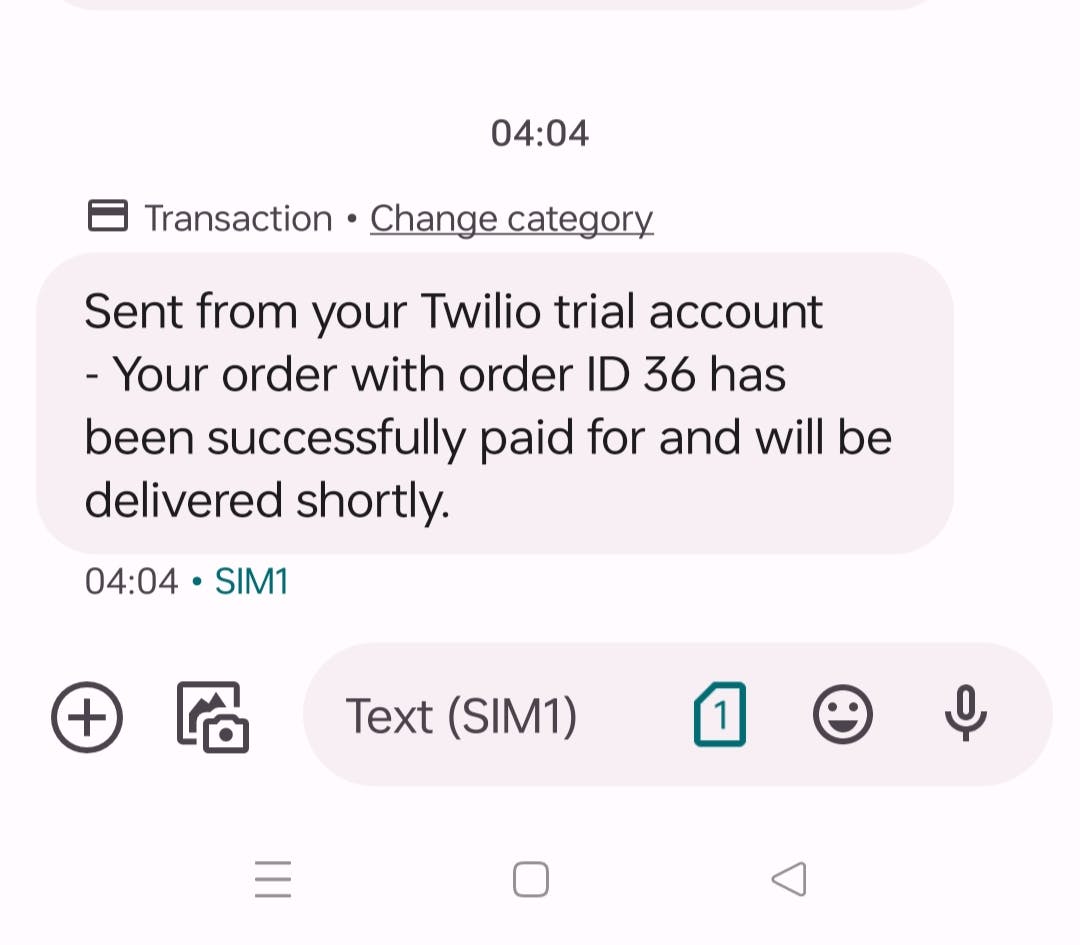
Twilio API is utilized to notify users when their order payment has been successfully processed.
The information sent to the user includes the order ID and a template confirming that the payment was successful and the order will be delivered shortly.
How to set up Twilio for SMS Notifications:
Step 1: Sign Up for Twilio
Go to the Twilio website.
Sign up for a Twilio account by following the registration process.
Step 2: Access Your Twilio Dashboard
- After logging in, you'll be directed to your Twilio dashboard.
Step 3: Obtain Twilio Account SID and Auth Token
In your Twilio dashboard, navigate to "Project Settings."
Note down your Twilio Account SID and Auth Token. These will be used for authentication.
Step 4: Obtain a Free Twilio Phone Number
Go to the "Phone Numbers" section in your Twilio dashboard.
Obtain a free Twilio phone number that will be used as the sender's number for SMS notifications.
Step 5: Configure .env File
In your Next.js project's
.env.localfile, set the following Twilio environment variables:TWILIO_ACCOUNT_SID=[Your Twilio Account SID]TWILIO_AUTH_TOKEN=[Your Twilio Auth Token]TWILIO_FROM_PHONE_NUMBER=[Your Twilio_Phone_Number]
Step 6: Send SMS Notifications
- Implement the necessary code in your Next.js application to send SMS notifications using Twilio's API, including the sender's phone number and recipient's phone number.
GitHub links for Twilio commands:
- update order status and notify ( 4 nodes, node-4 sends SMS to user's phone number after the payment succeeds )
f‣ Upstash API Integration ( Redis )
The Upstash API integration is used in conjunction with commands to temporarily store Stripe payment intents for a duration of 20 seconds in case a payment retry is necessary.
If the retries fail after 20 seconds, the payment intent is removed and the transaction is considered unsuccessful.
How to set up Upstash for Redis Integration w/ Stripe:
Step 1: Sign Up for Upstash
Go to the Upstash website.
Sign up for an Upstash account by following the registration process.
Step 2: Access Your Upstash Dashboard
- After logging in, you'll be directed to your Upstash dashboard.
Step 3: Create a Redis Database
In your Upstash dashboard, navigate to the "Databases" or "Create Database" section.
Create a new Redis database with your preferred configurations.
Step 4: Obtain Upstash Redis REST Token and REST Endpoint
In your Upstash dashboard, navigate to the "API Keys" or "Tokens" section.
Obtain the Upstash Redis REST token (API token) needed for authentication.
Locate and note the REST endpoint URL associated with your newly created Redis database.
Step 5: Configure .env File
In your Next.js project's
.env.localfile set the following Upstash environment variables:UPSTASH_REDIS_REST_TOKEN=Your_Upstash_Redis_Rest_TokenUPSTASH_ENDPOINT=Your_Upstash_Redis_REST_Endpoint
GitHub links for Upstash commands:
- create stripe payment intent ( 1 node, upstash redis is used to set the payment intent detail which is later read from the TRPC backend using the corresponding orderid to perform retries on failure )
g‣ Admin Menu Editor ( Next.js )
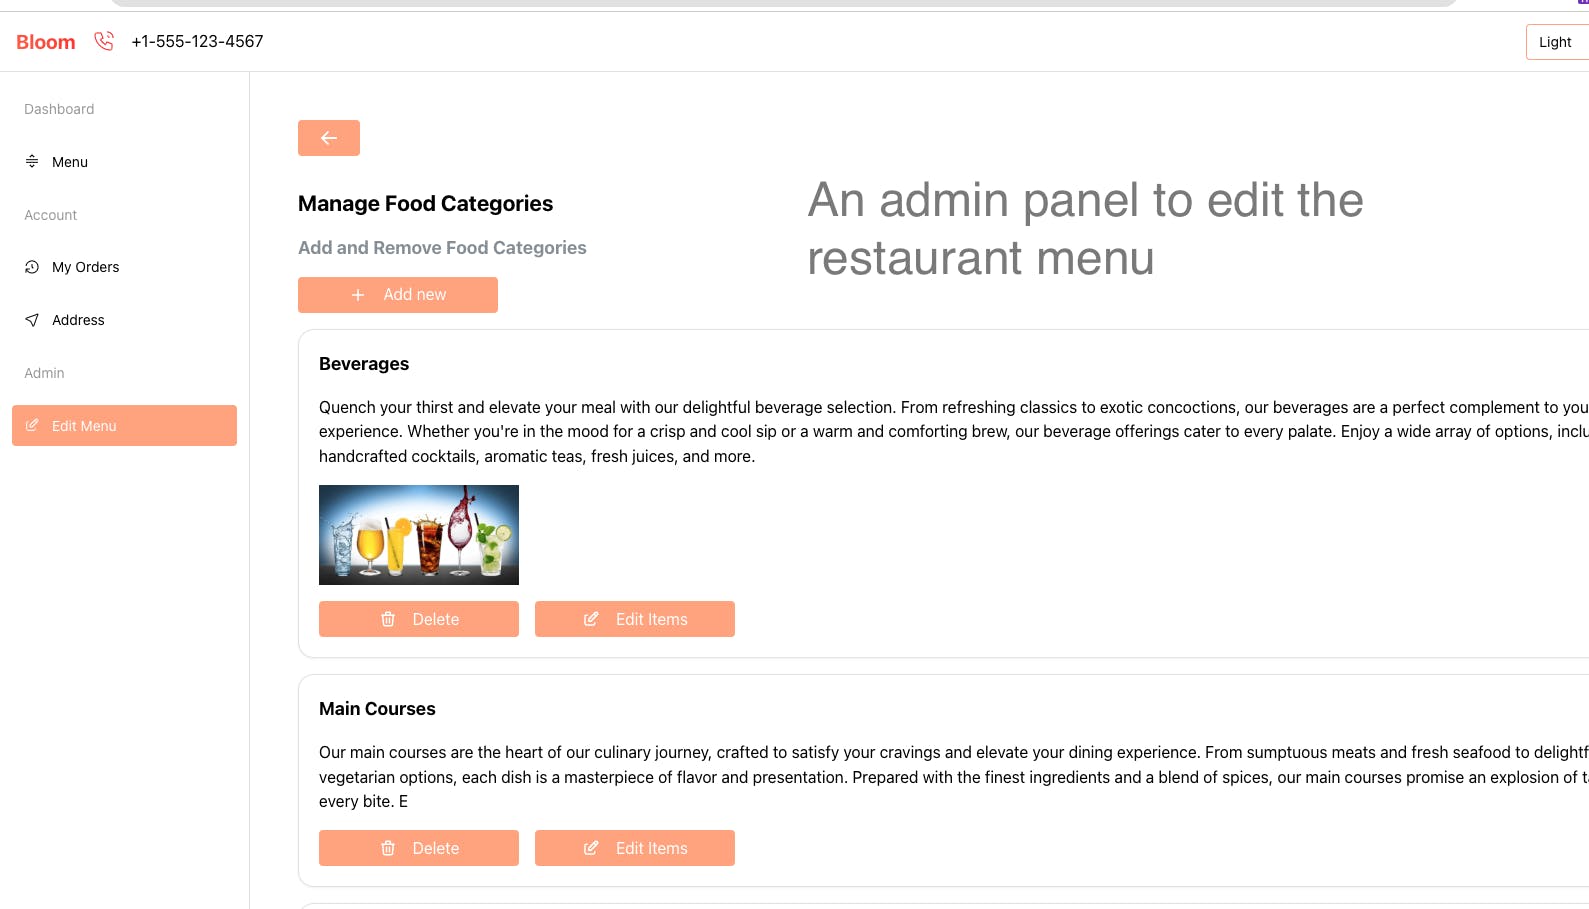
i. Add/Remove Food Categories in Menu:
Admin users can make and remove food groups like drinks, main dishes, starters, and more.
They can assign names, descriptions, and images to each category for easy identification. Image uploads happen through the s3 upload plugin for columns through Outerbase.
Commands GitHub links:
create a new food category command ( 1 node )
delete a food category ( 1 node )
ii. Add/Remove Food Items in a Food Category
Admin users can add food items to the food categories, including names, descriptions, images, and prices for the food item.
They can use the S3 uploader plugin and Outerbase configuration window to set up the column plugin to upload pictures of food items in the food item table.
GitHub links for commands::
add a food item to a category ( 1 node )
delete a food item from a category ( 1 node )
3‣ Outerbase Plugins
Bloom currently has two Outerbase plugins: 1. S3 uploader column plugin that uploads images to a private AWS bucket and associates them with menu items, and 2. A table plugin that assists restaurant staff with order management.
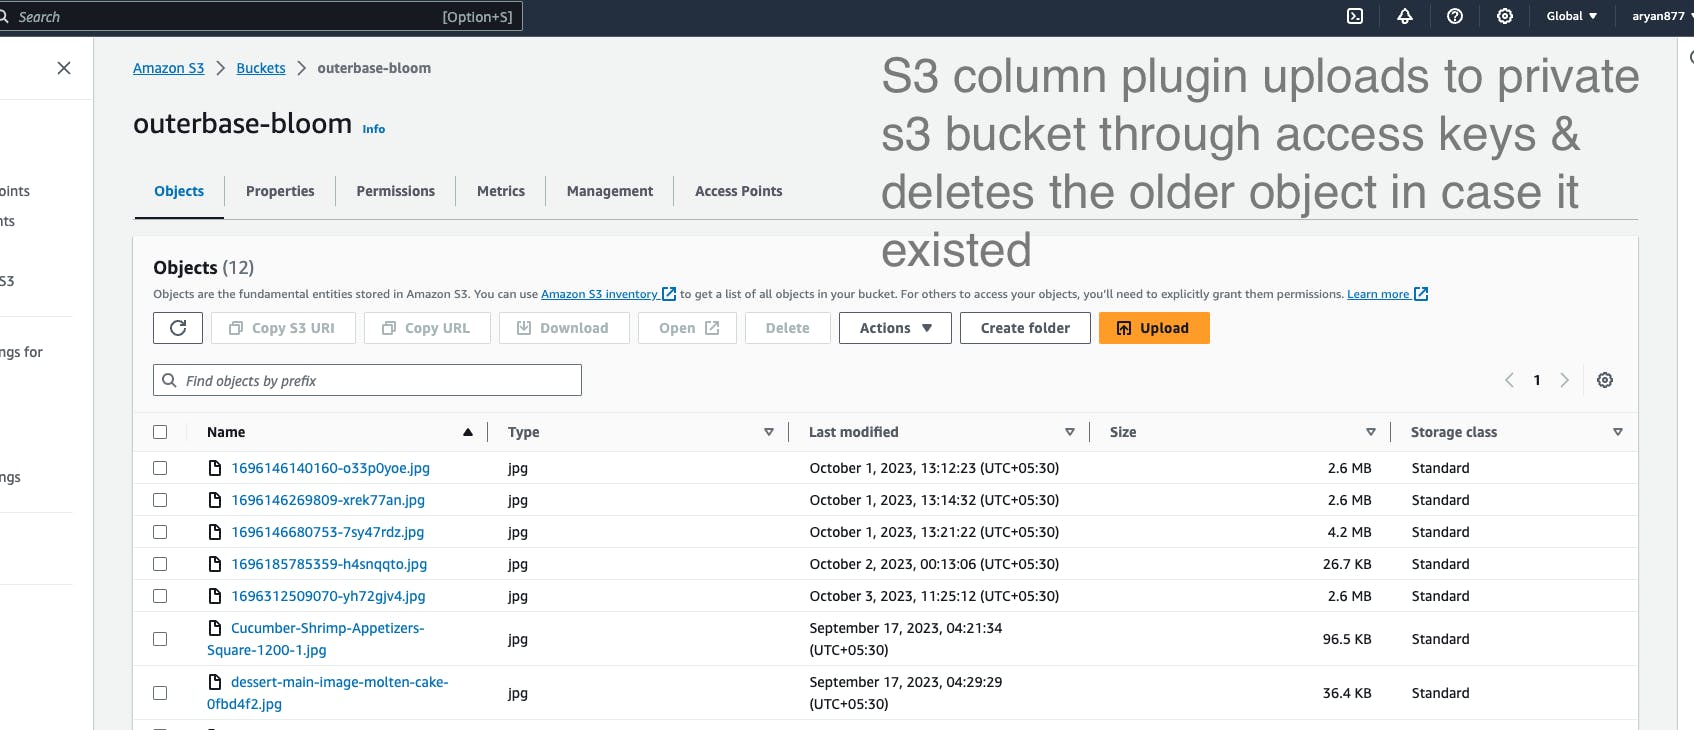
a‣ S3 Uploader Column Plugin
This column plugin is used on the Outerbase table for food items and food categories to upload images for specific category items or food items within that category.
It functions as a file input that uploads to AWS S3 using an access key and secret access key, utilizing pre-signed URLs. Meanwhile, the S3 bucket maintains all public access blocked, ensuring security.
Images can also be previewed. However, due to issues encountered with the update cell event in the beta version of Outerbase, a full page refresh is currently required before the image becomes visible. As soon as I can resolve this issue, I will address it after the hackathon and discuss potential fixes with the Outerbase team.
The S3 uploader plugin reads the 'rowValue', extracts the table's primary key, and updates the old value using an Outerbase command. This process permanently replaces the previous CellValue in the database.
The plugin also deletes the older S3 file ❌, using its key in the cellValue, before replacing it to prevent any redundant data from accumulating in the S3 bucket.
How to set up your S3 Bucket to store images :
Step 1: Create an S3 Bucket
Log in to AWS.
Go to S3.
Create a bucket with a unique name.
Choose a region.
Enable "Block all public access."
Create the bucket.
Step 2: Create an IAM User
In AWS, create an IAM user.
Attach "AmazonS3FullAccess" permission.
Generate security credentials for the IAM user.
Step 3: Configure Outerbase Plugin
In the S3 Uploader column plugin's configuration, enter the IAM access keys.
Specify the bucket name and region.
You're ready to go!
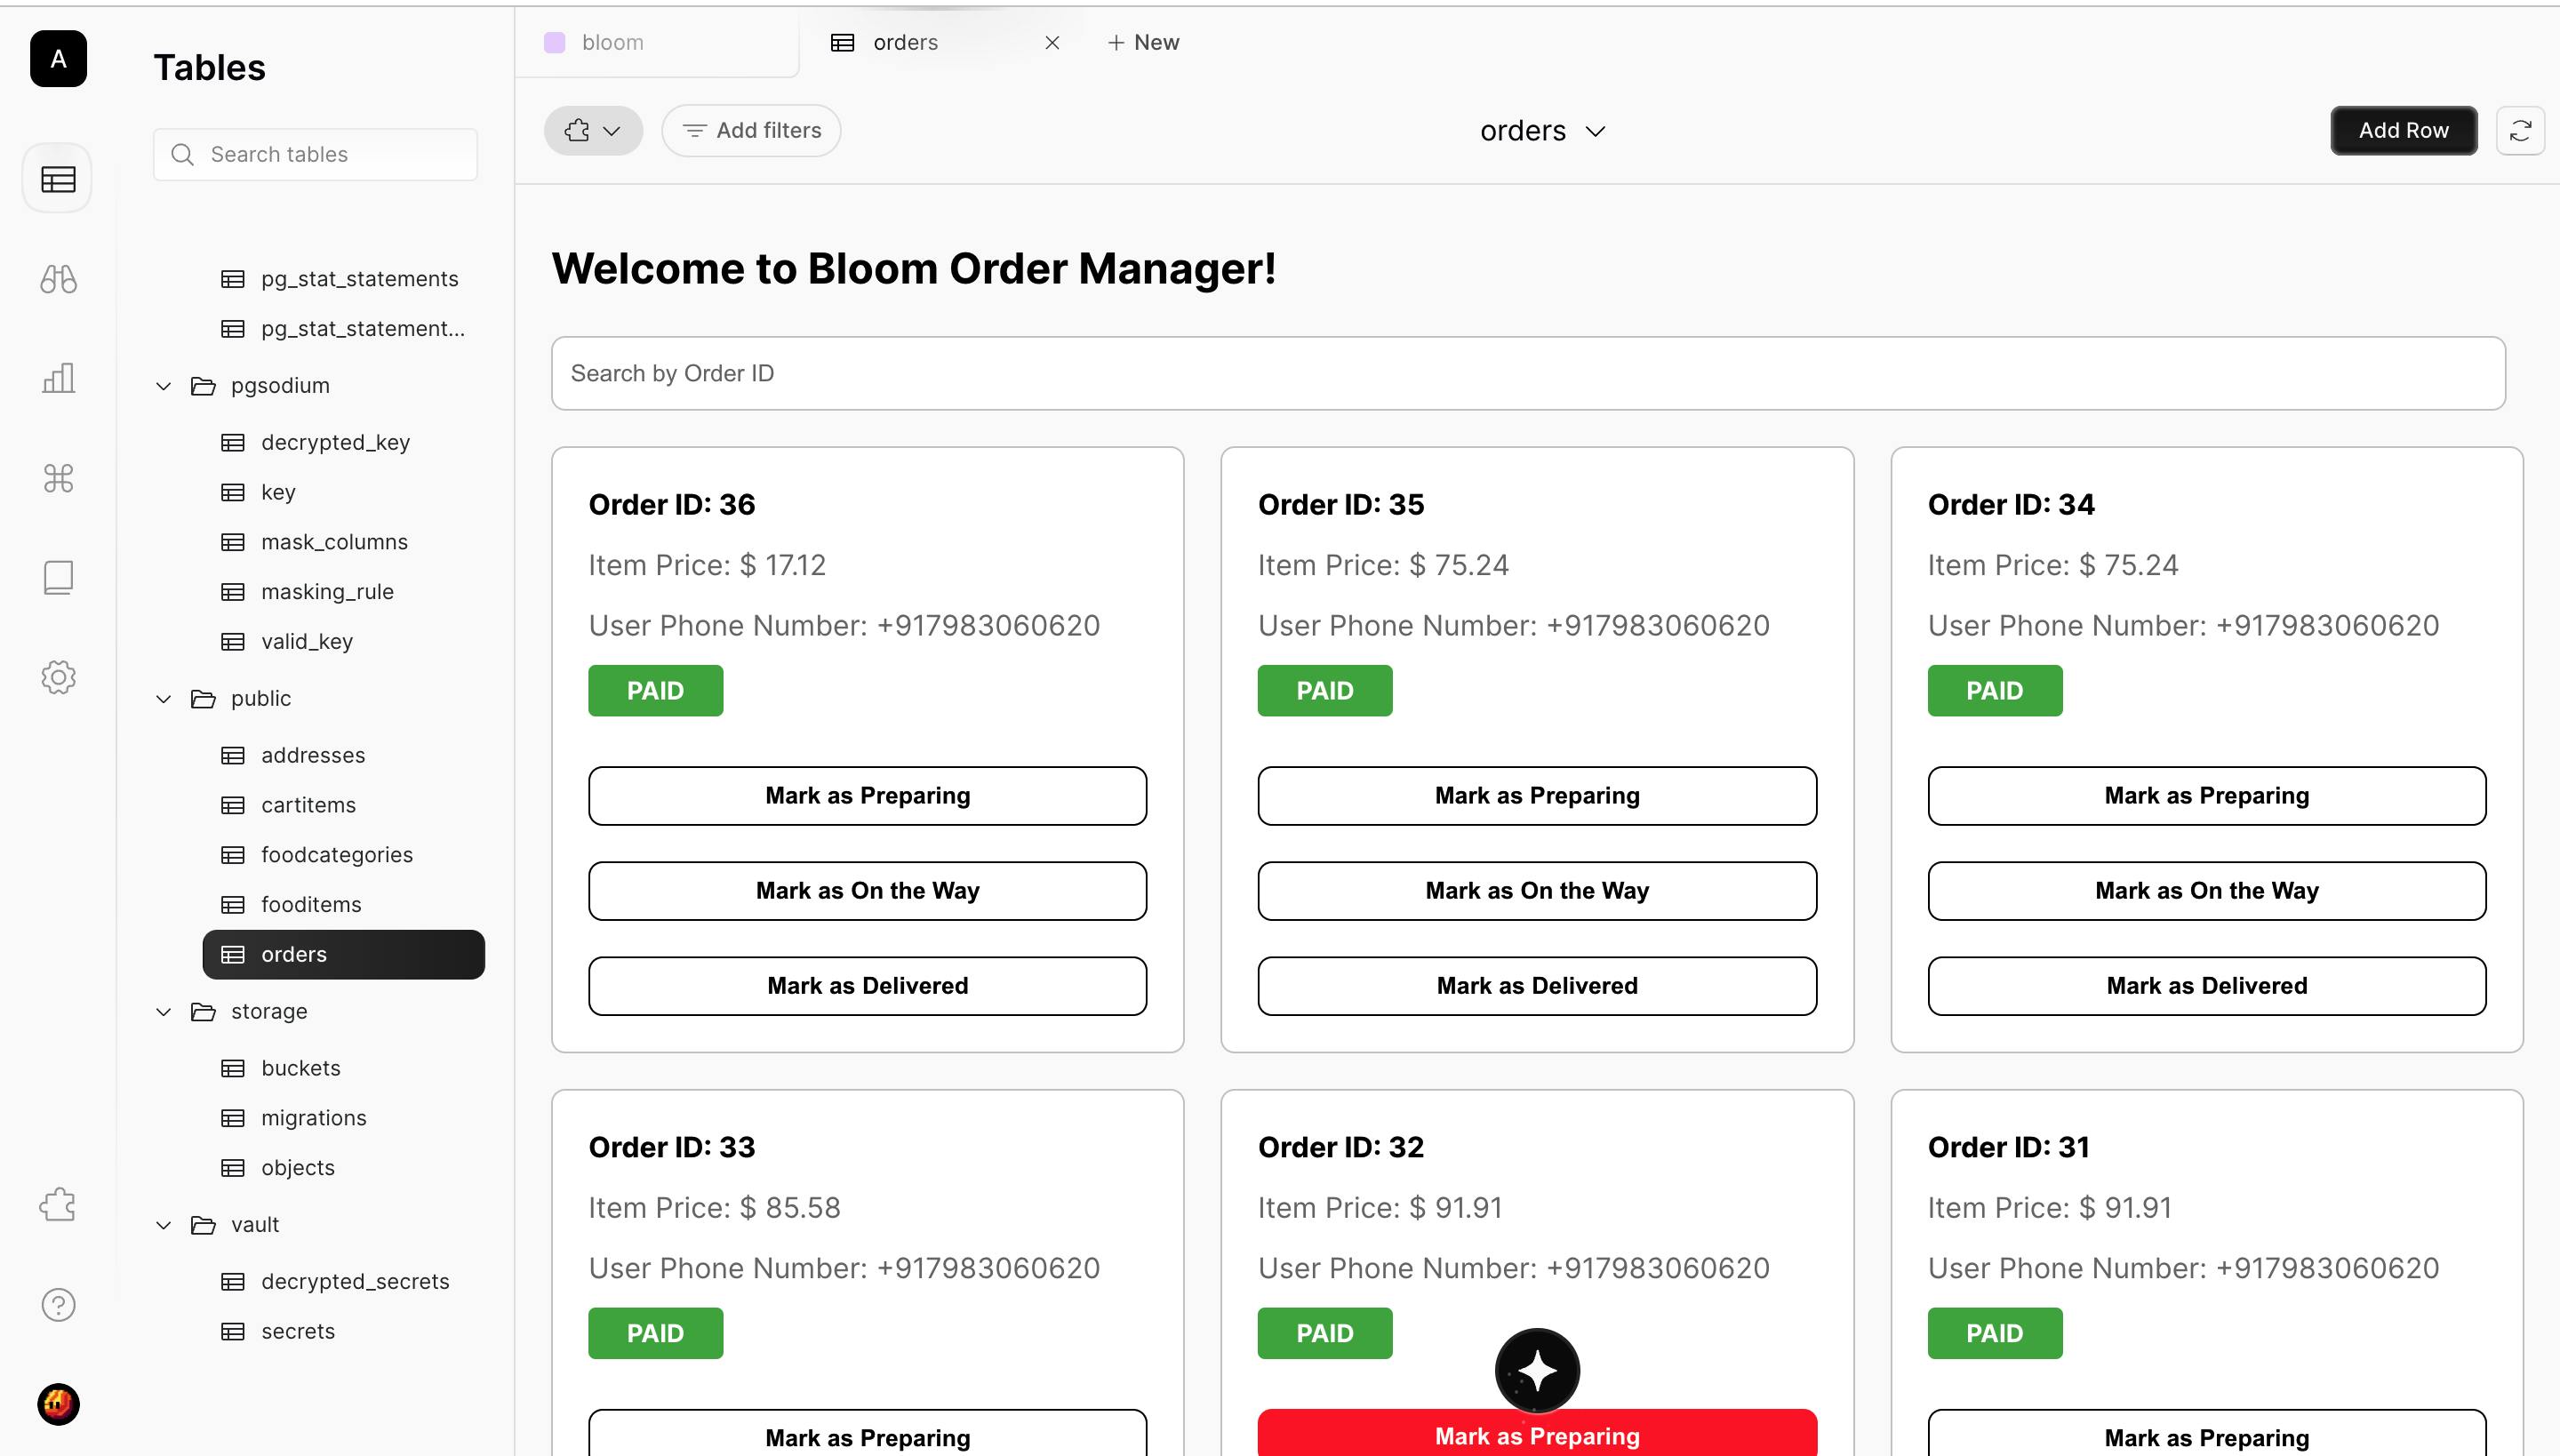
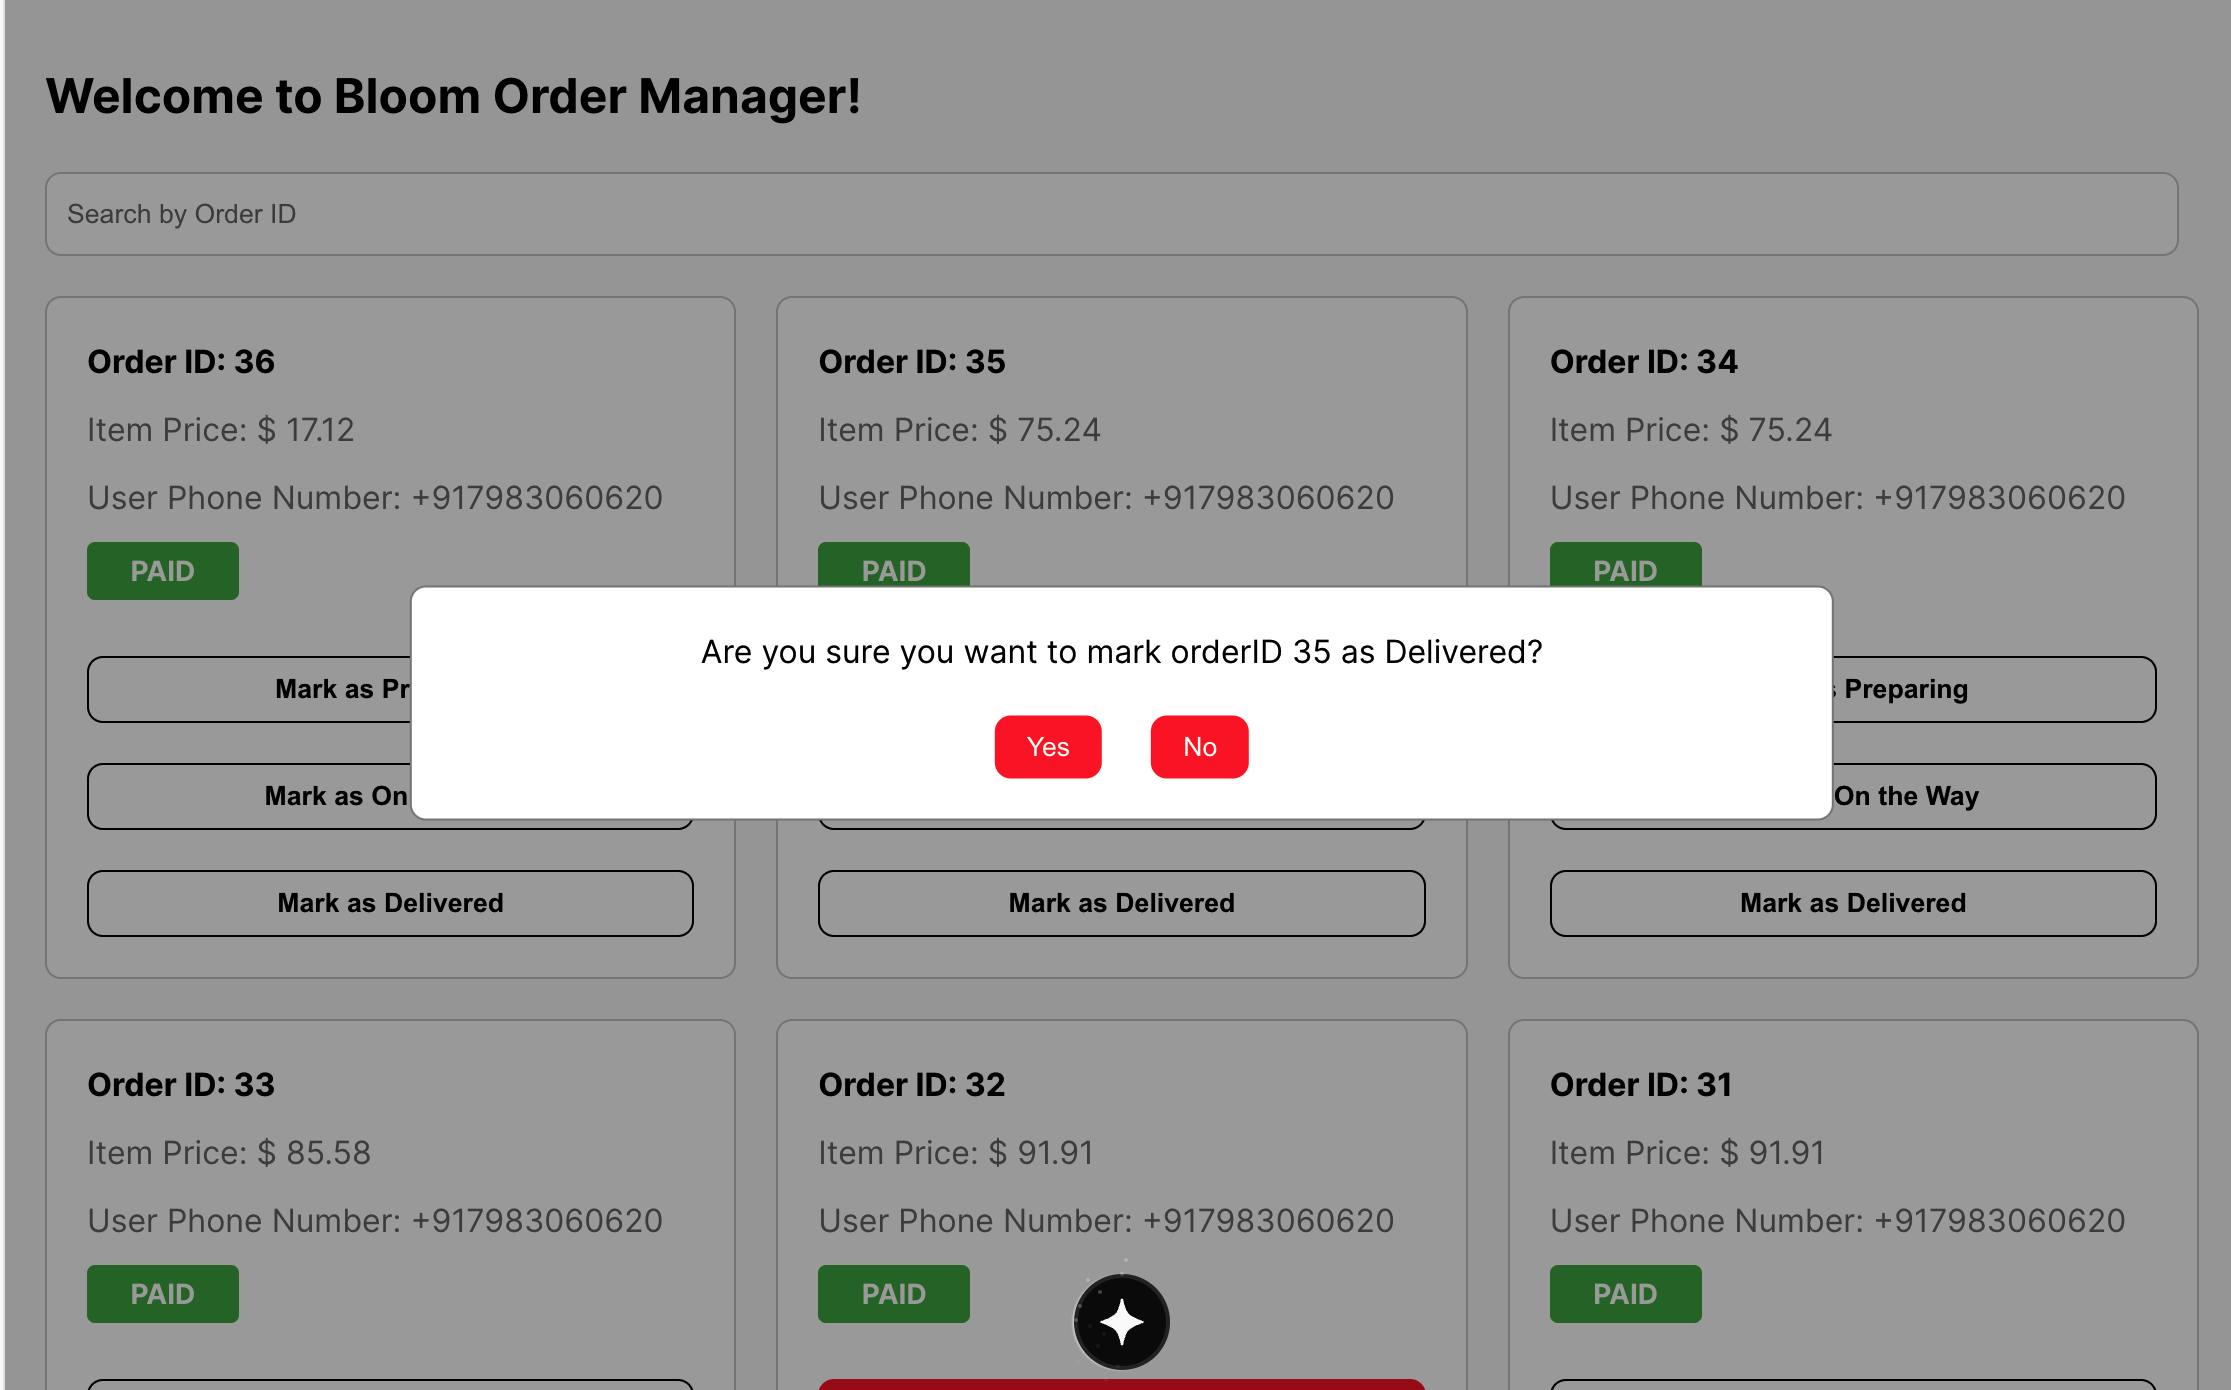
b‣ Order Manager Table Plugin ( for Staff )
This plugin is a table plugin that can be used to comprehensively manage order tracking and delivery after payment has been made.
Here, all orders appear, and we can mark them at various stages ( such as Preparing, on the Way, Delivered ) as the admin to keep users informed about their order status on the Next.js frontend app directly from the plugin.
Additionally, we have a search bar to search by order ID. However, what's even more powerful is the filter provided by Outerbase, which allows for quick filtering of orders based on raw SQL parameters for fast access.
Implemented command integration to update the order status for the end user, incorporating UI features such as a confirmation modal.
link: https://github.com/aryan877/outerbase-plugins/blob/master/order-manager-table-plugin.js
SQL Queries for Initial Table Setup
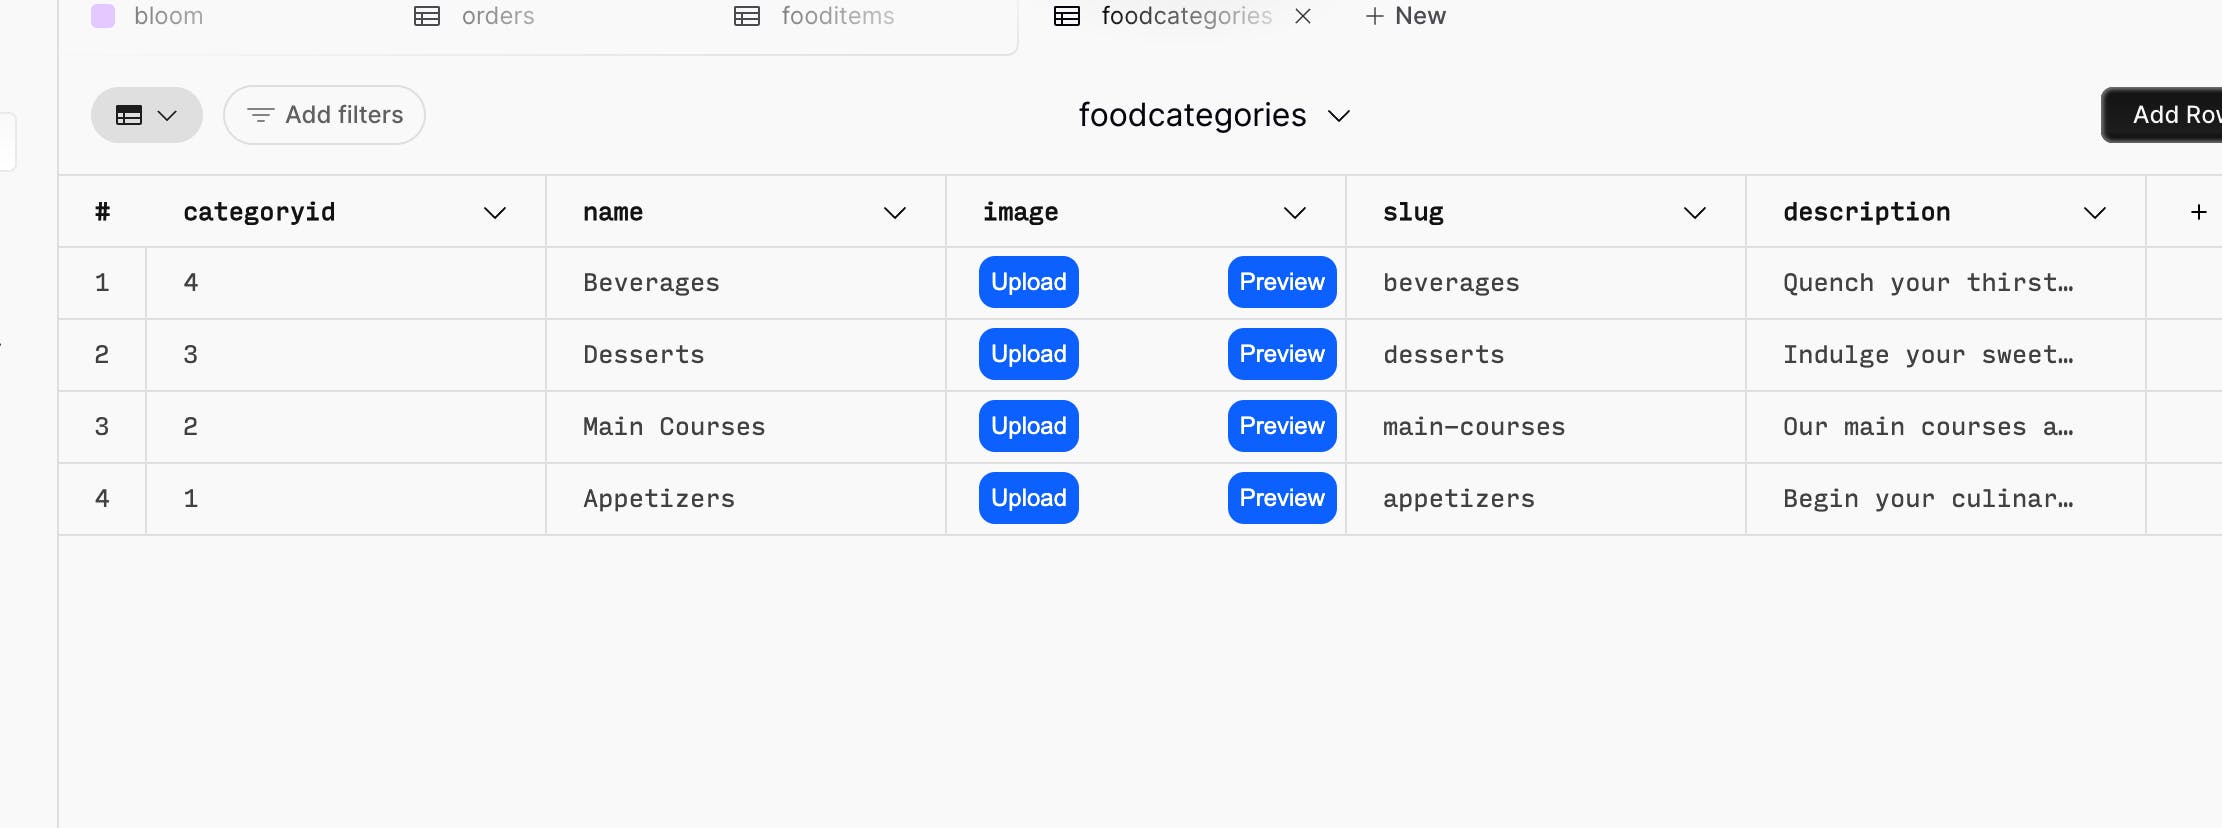
i. food categories table
Food categories encompass various broad classifications, such as beverages, main courses, appetizers, and any other general categories a restaurant may offer. Each food item is associated with a category ID.
      -- Create the table
      CREATE TABLE cartitems (
          cartitemid SERIAL PRIMARY KEY,
          userid TEXT NOT NULL,
          itemid INT NOT NULL,
          quantity INT NOT NULL
      );

      -- Drop the constraint if it exists
      ALTER TABLE cartitems
      DROP CONSTRAINT IF EXISTS unique_user_item;

      -- Create the constraint
      ALTER TABLE cartitems
      ADD CONSTRAINT unique_user_item UNIQUE (userid, itemid);

      -- Enable Row-Level Security (RLS) on the cartitems table
      ALTER TABLE cartitems ENABLE ROW LEVEL SECURITY;
ii. food items table
Food items belong to a specific category, with each category containing multiple food items. Each food item has a name, description, image, and price. They are connected to their respective food categories through a foreign key based on the category ID and a slug.
      CREATE TABLE fooditems (
          itemid SERIAL PRIMARY KEY,
          name TEXT NOT NULL,
          price NUMERIC,
          categoryid INT NOT NULL REFERENCES foodcategories(categoryid),
          slug TEXT,
          image TEXT,
          description TEXT
      );

       -- Enable Row-Level Security (RLS) on the fooditems table
      ALTER TABLE fooditems ENABLE ROW LEVEL SECURITY;
iii. cart items table
Cart items hold cart items for all users across the app and are used to query the cart items for a single user in the application. Users can modify these items to add or remove them and dynamically update the prices.
Upon placing an order, cart items are reset, and the cart is made empty again with 0 items.
      -- Create the table
      CREATE TABLE cartitems (
          cartitemid SERIAL PRIMARY KEY,
          userid TEXT NOT NULL,
          itemid INT NOT NULL,
          quantity INT NOT NULL
      );

      -- Drop the constraint if it exists
      ALTER TABLE cartitems
      DROP CONSTRAINT IF EXISTS unique_user_item;

      -- Create the constraint
      ALTER TABLE cartitems
      ADD CONSTRAINT unique_user_item UNIQUE (userid, itemid);

      -- Enable Row-Level Security (RLS) on the cartitems table
      ALTER TABLE cartitems ENABLE ROW LEVEL SECURITY;
iv. orders table
The orders table stores all the orders placed by users across the app. It contains the address copied from the addresses table, as the address in the orders table cannot be directly linked to the addresses table. This is to ensure that if an address is deleted from the addresses table, the order will still have the address data available for querying.
The orders table contains all the essential fields for restaurant staff to effectively process an order from its inception, and these are sent to the Slack channel using commands, as well as to the user through Mailgun API using commands.
The Enum is utilized to indicate the order status, which is updated through the Order Manager table plugin using command integration within the table plugin.
      -- Drop the enum type if it exists
      DROP TYPE IF EXISTS order_status_enum;

      -- Create the enum type with valid order status values
      CREATE TYPE order_status_enum AS ENUM (
        'Order Received',
        'Preparation Started',
        'Delivered',
        'On The Way'
      );

      -- Create the orders table with additional fields, all set to NOT NULL
      CREATE TABLE orders (
          orderid SERIAL PRIMARY KEY,
          userid TEXT NOT NULL,
          ordered_at TIMESTAMPTZ NOT NULL DEFAULT NOW(),
          delivered_at TIMESTAMPTZ,
          payment_status BOOLEAN DEFAULT FALSE,
          delivery_status order_status_enum DEFAULT 'Order Received',
          total_price DECIMAL(10, 2) NOT NULL,
          coupon_code TEXT,
          order_items JSONB[] NOT NULL,
          email TEXT NOT NULL,
          phone_number TEXT NOT NULL,
          intentid TEXT,
          google_formatted_address TEXT,
          flat_number TEXT NOT NULL,
          landmark TEXT,
          street TEXT NOT NULL,
          state TEXT NOT NULL,
          pincode TEXT NOT NULL,
          delivery_phone_number TEXT NOT NULL,
          latitude DOUBLE PRECISION NOT NULL,
          longitude DOUBLE PRECISION NOT NULL,
          first_name TEXT NOT NULL
      );

      -- Enable Row-Level Security (RLS) on the orders table
      ALTER TABLE orders ENABLE ROW LEVEL SECURITY;
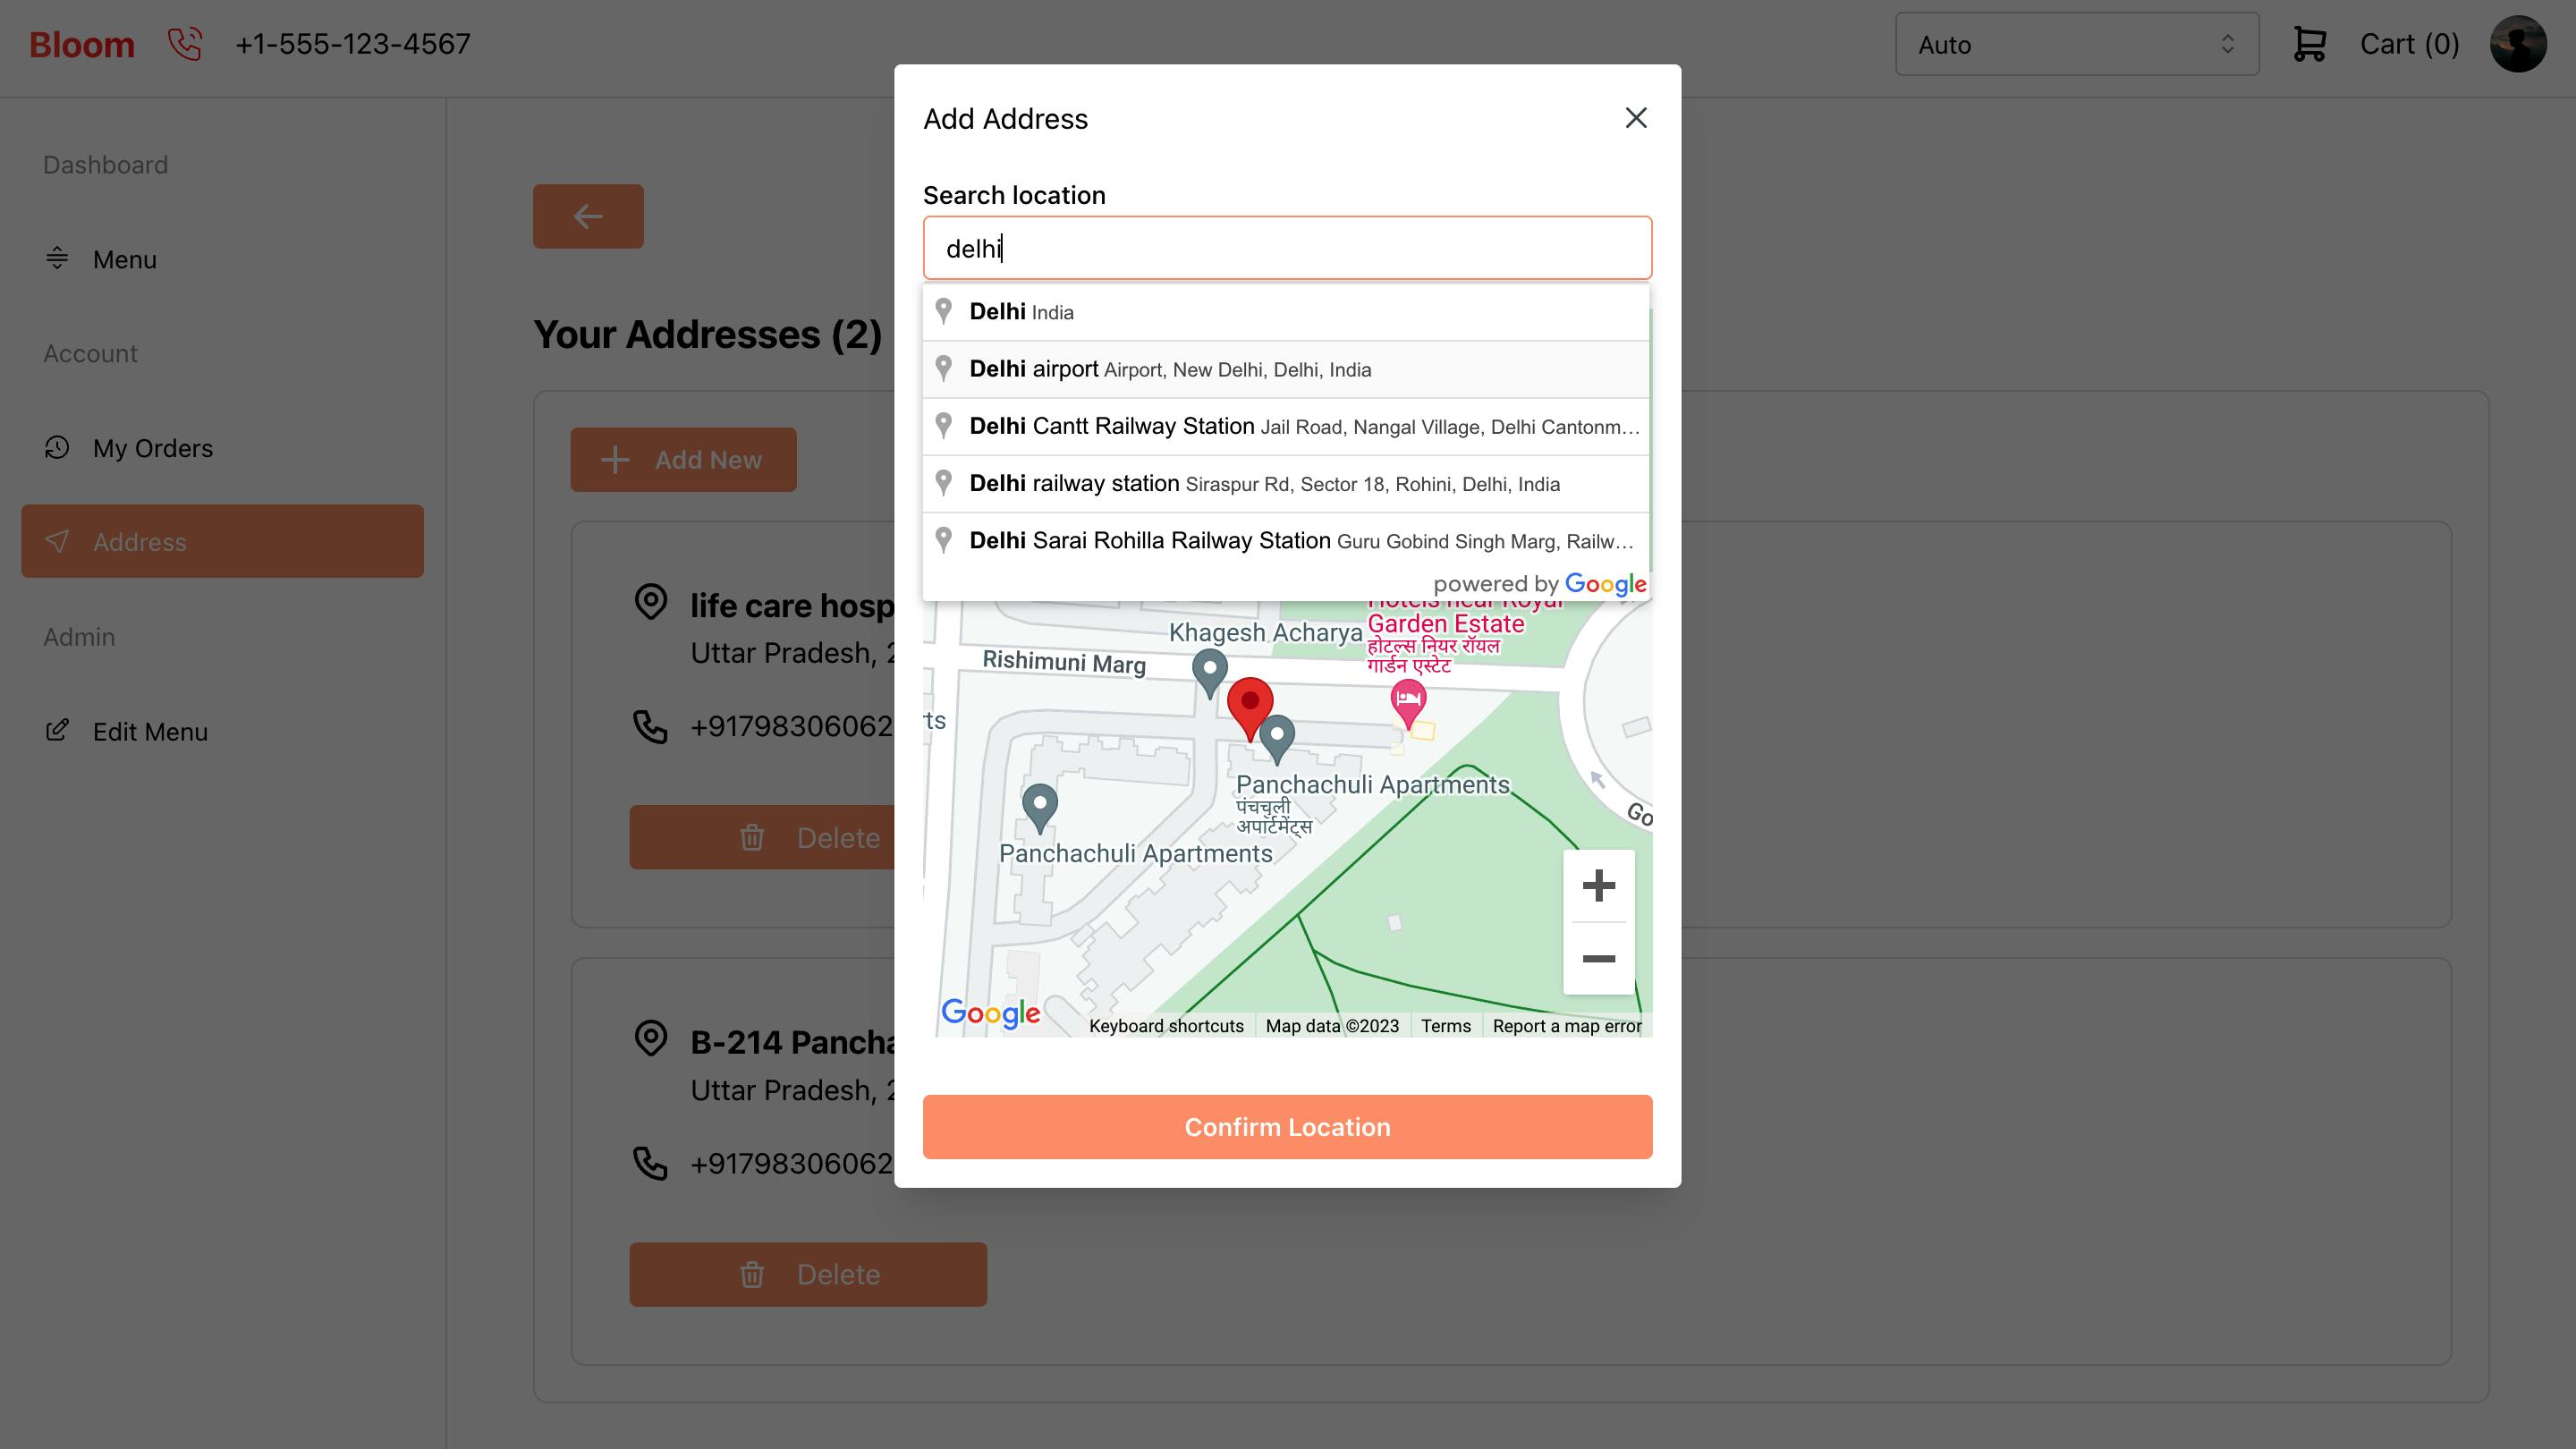
v. addresses table
The addresses table stores all addresses for every user within the app and retrieves them for each user as needed. Users can create or delete addresses for their accounts using outerbase commands.
Integration with Google Maps has been implemented on the front end, allowing users to search for and add latitude and longitude coordinates. These coordinates are then sent to a Slack channel as a Google Maps link, which staff members can access for delivery purposes.
      CREATE TABLE addresses (
          addressid SERIAL PRIMARY KEY,
          userid TEXT NOT NULL,
          street TEXT NOT NULL,
          google_formatted_address TEXT,
          flat_number TEXT NOT NULL,
          landmark TEXT,
          state TEXT NOT NULL,
          pincode TEXT NOT NULL,
          phone_number TEXT NOT NULL,
          longitude DECIMAL(10, 6) NOT NULL, -- Precision of 10 with 6 decimal places for longitude
          latitude DECIMAL(10, 6) NOT NULL,  -- Precision of 10 with 6 decimal places for latitude
          created_at TIMESTAMPTZ NOT NULL DEFAULT NOW(),
          updated_at TIMESTAMPTZ NOT NULL DEFAULT NOW()
      );

      -- Enable Row-Level Security (RLS) on the addresses table
      ALTER TABLE addresses ENABLE ROW LEVEL SECURITY;
Challenges Faced
I did not encounter any significant challenges while developing this application, as I had a clear vision from the beginning. Whenever I found myself stuck at various stages, the outstanding Outerbase team was always present and incredibly responsive. 💙
In my opinion, I have grown quite fond of using commands from Outerbase. The concept of nodes and how they operate in a chain is something I plan to utilize in my future projects as well.
Code Repository
next js frontend: https://github.com/aryan877/outerbase-next-frontend
outerbase commands: https://github.com/aryan877/outerbase-commands
outerbase plugins: https://github.com/aryan877/outerbase-plugins
SQL queries for initial setup of db tables: https://github.com/aryan877/bloom-outerbase-queries